Alert Logic Threat Manager for Google Cloud Platform (Windows)
- Review the Requirements for Alert Logic Threat Manager for Google Cloud Platform.
- Make sure you have installed gcloud compute and have authenticated your project to the Google compute engine. For more information, see the Google documentation about the gcutil Tool.
- Before you can use gcloud compute to work with the Threat Manager image, log in to the Google developers console and make sure you have the correct Project ID. You need this information in a later step.
-
For your convenience, the Alert Logic agent activates collection for Threat Manager, Log Manager, and Web Security Manager. For more information, please contact Technical Support: US:(877) 484-8383, EU: +44 (0) 203 011 5533
Log in to the Google developers console
To get the Project ID:
- Log in to the Google Developers Console.
- Select your project.
- Get the Project ID.

Get the Threat Manager image
To get the image:
- Use gcloud compute to enter the following command to copy the Threat Manager image into your project.
gcloud compute images create [image name]--project --source-uri [image uri]

gcloud compute images create tmc-prod-image --source-uri https://storage.cloud.google.com/alertlogic/TM/tmc-prod-image-v1.image.tar.gz
Create a new instance with the Threat Manager image
To create a new instance:
- Use gcloud compute to enter the following command to copy the Threat Manager image into your project.
gcloud compute instances create [instance type] --zone [zone name] --machine-type [machine] --image [instance name]
gcloud compute instances create al-tm-vl --zone us-central1-a --machine-type n1-standard-1 --image tmc-prod-image
Send appliance external ID to Alert Logic
To send the appliance external ID to Alert Logic:
- Find the external IP for the appliance. To do so, use the gcloud compute command line or use the Google Developers Console.
- Contact Alert Logic provisioning to provide this IP address. You can (877) 484-8383 and select the appropriate option.
Contact Alert Logic to claim your appliance
To contact Alert Logic to claim your appliance:
- In the US, call (877) 484-8383 and select the appropriate option.
- In the EU, call +44 (0) 203 011 5533 and do the same.
After the appliance claim, the Alert Logic provisioning engineer adds your appliance details in the Alert Logic data center back end and establishes connectivity to your new appliance.
Download the agent
To download the agent:
- In the Alert Logic console, open the Settings menu, and then click Support Information.
- From the menu bar, click Quick Install Guide and Downloads.
- Download the appropriate agent and follow the on-screen instructions.
- For Windows users, click Windows Agents, and then select the desired agent.
- For Linux users, click Linux Agents. Linux users can select either Debian-based agent installers or RPM-based agent installers. Both installers are available in a 32-bit or 64-bit format.
- Locate the Unique Registration Key from the Downloads screen. Copy your unique registration key. You will need to enter this key to install the agent.
If you have an active RBAC role, and have configured agents to automatically update, the agent you install automatically assigns itself to the local appliance and you need not enter the Unique Registration Key.

Alert Logic uses the Unique Registration Key to assign the agent to your Alert Logic account.
Install the agent for Windows
Install the agent via the GUI
To install the agent:

This method does not support image capture.
- Run the MSI package.
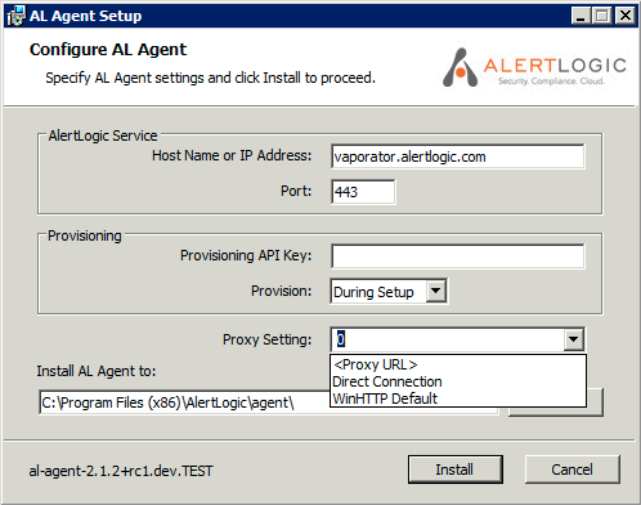
- In Provisioning API Key, paste your Unique Registration Key.
If you have an active RBAC role, and have configured agents to automatically update, the agent you install automatically assigns itself to the local appliance and you need not enter the Unique Registration Key.
- In Provision, select During Setup.
- In Proxy Setting, select a connection method if you want traffic to pass through a proxy. You can connect via Direct Connection or a web proxy. You can also enter the URL of the proxy server.
- Click Install.
- Verify that the agent has registered with the Alert Logic console. To do so, navigate to the deployment the agent is assigned to, click Hosts and Sources, click Sources, and then search for the agent.
Agent registration can take several minutes.
Install the agent via the command prompt with image capture
To install the agent via the command prompt and capture the image:
- Copy the MSI file to the target machine.
- Type the following command:
msiexec /i [path to MSI file] prov_key=[unique registration key] /q
- /i installs the agent normally.
- prov_key=[unique registration key] is your Unique Registration Key.
msiexec /i c:\downloads\al-agent-1.0.33.msi prov_only=host prov_key=da39a3ee5e6b4b0d3255bfef95641890dnu80799/q
- (Optional) If you have set up a NAT or virtual appliance and you want to use it as a single point of egress, enter the corresponding host name or IP address or port via the following command prompt parameters:
- sensor_host=[host] indicates the IP address where the agent should forward logs.
- sensor_port=[port] indicates the TCP port where the agent should connect.
-
Once you are finished preparing the image, set the agent service start type to Automatic.
- Verify that the agent has registered with the Alert Logic console. To do so, click Deployments, click the deployment the agent is assigned to, click Hosts and Sources, click Sources, and then search for your agent.
Agent registration can take several minutes.
Create an assignment policy
An assignment policy is a set of rules that indicates to appliances how to handle incoming traffic; the appliance will either accept or ignore the traffic. An assignment policy directs protected hosts to encrypt traffic and send traffic to specific appliances. In a dynamic environment where IP addresses often change, an assignment policy ensures that hosts always correspond to their appliances.
To create an assignment policy:
- In the Alert Logic console, click CONFIGURATION, and then click Deployments.
- In the left navigation area, click Policies.
- Click the Assignment tab.
- Click the Add icon (
 ).
). - In Appliance Assignment Policy Name, enter a name.
- In Appliances, select an appliance.
- Click Save.
Assign a policy to a protected host
To assign a policy to a protected host:
- In the Alert Logic console, click CONFIGURATION, and then click Deployments.
- Click the All Deployments tile.
- In the left navigation pane, click Networks and Hosts, and then click the Protected Hosts tab.
- Click the pencil icon (
 ) for the desired protected host.
 - Select Use an Existing Assignment Policy.
- From the Existing Assignment Policy drop-down menu, select the assignment policy you want to use.
- Click SAVE.