Manage PCI scans
Through the Alert Logic console, you can schedule quarterly external scans that are required for Payment Card Industry (PCI) compliance. You can quickly and easily view the results of those scans in the Alert Logic console, and then work with Alert Logic, as needed, to resolve vulnerabilities and prove compliance to auditors.
Working with PCI compliance requires documents available from the PCI Security Standards Council (PCI SSC). Documents include the Payment Card Industry Data Security Standard (DSS) and the current release of the ASV Program Guide.
Review the recommended process
The following procedure outlines the suggested workflow to use Alert Logic vulnerability scans for your PCI compliance requirements.
To use Alert Logic scans for PCI compliance:
- Schedule a PCI scan.
When you run a PCI scan, Threat Manager generates a preliminary PCI compliance report and sends an e-mail to the configured alert devices. - View PCI compliance status and history.
- If your preliminary PCI compliance report indicates that you are compliant, then complete your final PCI compliance documentation.
- If your preliminary PCI compliance report indicates that you are not compliant, or if you need to scan again, complete the following actions:
- Address PCI compliance vulnerabilities.
- If you have a vulnerability that you believe contains a false positive, contact Technical Support (US:(877) 484-8383, EU: +44 (0) 203 011 5533) to discuss the vulnerability.
- If you have a vulnerability that you cannot address due to a business or technological constraint, dispute the failing vulnerabilities, and then contact Technical Support (US:(877) 484-8383, EU: +44 (0) 203 011 5533) to discuss the vulnerability and any compensating controls in your environment that reduce the risk associated with the vulnerability.

Technical Support requires specific information for PCI scan disputes. Before you contact Technical Support, have the following information ready:
- The PCI compliance report ID number, which you can find in the heading of the PCI compliance report
- The date and time when the PCI compliance report was generated, which you can find in the heading of the PCI compliance report
- Any compensating control documentation associated with the vulnerability before you contact the Alert Logic Security Operations Center (SOC)
- After you address all vulnerabilities and resolve disputes, then complete final PCI compliance documentation.
View PCI compliance status and history
Threat Manager simplifies tracking, analyzing, and documenting your PCI compliance. In the Alert Logic console Scans page, on the PCI Compliance tab, you can view your current and historical PCI compliance status.
By default, your PCI compliance status is "Non-Compliant." The status changes to "Compliant" only after you generate your final PCI compliance report. For more information, see Complete final PCI compliance documentation.
To view your PCI compliance status and history:
- At the top of the Alert Logic console, in the drop-down menu, click Scans.
- On the Scans page, click the PCI Compliance tab.
A list of the latest PCI scan results are displayed. - To view your most recent PCI compliance scan results, under Latest 25 Reports, click the name of the report to view.
- (Optional) To view a complete archive of your PCI compliance scan results:
- At the top of the Alert Logic console, in the drop-down menu, click Reports.
- In the left navigation pane, expand Archived Reports.
Schedule a PCI scan
When you schedule a PCI scan, Threat Manager runs the scan as specified in the schedule, and then displays the results of the scan in the PCI Compliance tab.
When you schedule a PCI scan, you attest that, at a minimum:
- You are responsible for proper scoping of the scans, and the scan includes all required components for a PCI DSS scope.
- You implemented network segmentation if you excluded any components from PCI DSS scope.
For more information about attestations, see the ASV Program Guide.
To schedule a PCI scan:
- At the top of the Alert Logic console, in the drop-down menu, click Scans.
- On the Scans page, click the PCI Compliance tab.
- Click Schedule New Scan.
- On the New PCI Scan page, in the Scan Title field, enter a descriptive title for the scan.
-
In All Targets (domain names of your web sites to distinguish multiple websites on the same IP address) and IP addresses to scan, enter all targets. PCI DSS requires customers to supply FQDNs in addition to external-facing IP addresses and other unique entryways into applications for the entire in-scope infrastructure. This includes, but is not limited to:
- Discrete IP addresses
- IP address ranges
- Domains for all web servers
- Domains for mail servers
- Domains used in name-based virtual hosting
- Web-server URLs to directories that cannot be reached by crawling the website from the home page
- Any other public-facing domains or domain aliases
To include multiple domains, enter each domain on a separate line. Do not use commas, semicolons, or other separators.
The box also uses what you enter to seed the scanner. Seed entries include hidden URLs that cannot be reached from the homepage. These seed URLs allow the scanner to reach more of your application, ensuring the most thorough possible scan.
- In Addresses to exclude, enter the TCP/IP addresses of the hosts you want to exclude from the scan operation, if applicable.
- In Your top level domains for scoping suggestions, enter top-level domains to help the PCI scanner find more scan targets that you want to include in the scan.
- Under Scan Schedule, specify how often to run the scan, the start time, and your time zone.
- Under Notification Settings, type the email address where you want to receive notifications when the scan is finished.
- Click Save.
Address PCI compliance vulnerabilities
After viewing the results of a PCI compliance scan, if the status displays "Non-compliant," you must address vulnerabilities.
A scan retains its non-compliant status until you generate a final report.
To address PCI compliance vulnerabilities:
- At the top of the Alert Logic console, in the drop-down menu, click Scans.
- On the Scans page, click the PCI Compliance tab.
- Under Latest 25 Reports, click the name of the non-compliant results that contain the vulnerabilities to address.
- In the PCI Scan Result report, click the name of the vulnerability to address to view information about the vulnerability, including the CVE number, a brief description of the vulnerability, and possible solutions.
- Review the information for the vulnerability and address as necessary. If you cannot address the vulnerability due to a business or technical constraint, you can dispute the vulnerability. For more information, see Dispute failing vulnerabilities.
- After you address each vulnerability identified in the PCI Scan Result report, run the scan again to verify you addressed the vulnerability. See Re-scan a non-compliant PCI scan.
Disable weak and anonymous ciphers
PCI-DSS requires web sites to use strong cryptography and security protocols such as Secure Socket Layer/Transport Layer Security (SSL/TLS) or Internet Protocol Security (IPsec) to safeguard sensitive cardholder data during transmission over open public networks. In addition, you must disable insecure protocols like SSL 2.0 and weak ciphers, or you will fail a PCI compliance scan.
Most versions of Apache have SSL 2.0 enabled by default. To disable SSL 2.0 and weak ciphers:
- Open the httpd.conf or ssl.conf file, then search for the SSLCipherSuite directive. If you do not have the directive, add it.
- Replace the contents with the following:
SSLProtocol -ALL +SSLv3 +TLSv1
SSLCipherSuite ALL:!ADH:RC4+RSA:+HIGH:+MEDIUM:!LOW:!SSLv2:!EXPORT - Save the file.
- Restart Apache.
More resources:
mod_ssl documentation for disabling SSL 2.0 and weak ciphers
The following registry settings can help secure ciphers and encryption settings for Microsoft Internet Information Server (IIS).
Alert Logic makes no warranty as to the efficacy of the script. Many services on a Windows computer may use SSL/TLS such as Remote Desktop, LDAP, HTTPs, SMTPs, or Windows remote management ports. Changing the encryption settings may affect other services. This script may need to be customized for your environment. Use this script at your own risk, and try it on a development environment first. Before you edit the registry, export the keys in the registry that you plan to edit, or back up the whole registry.
Restart the server after implementing the registry changes.
[HKEY_LOCAL_MACHINE\SYSTEM\CurrentControlSet\Control\SecurityProviders]
“SecurityProviders”=”msapsspc.dll, schannel.dll, digest.dll, msnsspc.dll”
[HKEY_LOCAL_MACHINE\SYSTEM\CurrentControlSet\Control\SecurityProviders\SaslProfiles]
“GSSAPI”=”Kerberos”
[HKEY_LOCAL_MACHINE\SYSTEM\CurrentControlSet\Control\SecurityProviders\SCHANNEL]
“EventLogging”=dword:00000001
[HKEY_LOCAL_MACHINE\SYSTEM\CurrentControlSet\Control\SecurityProviders\SCHANNEL]
“AllowInsecureRenegoServers”=dword:00000000
[HKEY_LOCAL_MACHINE\SYSTEM\CurrentControlSet\Control\SecurityProviders\SCHANNEL\Ciphers\DES 56/56]
“Enabled”=dword:00000000
[HKEY_LOCAL_MACHINE\SYSTEM\CurrentControlSet\Control\SecurityProviders\SCHANNEL\Ciphers\NULL]
“Enabled”=dword:00000000
[HKEY_LOCAL_MACHINE\SYSTEM\CurrentControlSet\Control\SecurityProviders\SCHANNEL\Ciphers\RC2 128/128]
“Enabled”=dword:00000000
[HKEY_LOCAL_MACHINE\SYSTEM\CurrentControlSet\Control\SecurityProviders\SCHANNEL\Ciphers\RC2 40/128]
“Enabled”=dword:00000000
[HKEY_LOCAL_MACHINE\SYSTEM\CurrentControlSet\Control\SecurityProviders\SCHANNEL\Ciphers\RC2 56/128]
“Enabled”=dword:00000000
[HKEY_LOCAL_MACHINE\SYSTEM\CurrentControlSet\Control\SecurityProviders\SCHANNEL\Ciphers\RC4 128/128]
“Enabled”=dword:00000000
[HKEY_LOCAL_MACHINE\SYSTEM\CurrentControlSet\Control\SecurityProviders\SCHANNEL\Ciphers\RC4 40/128]
“Enabled”=dword:00000000
[HKEY_LOCAL_MACHINE\SYSTEM\CurrentControlSet\Control\SecurityProviders\SCHANNEL\Ciphers\RC4 56/128]
“Enabled”=dword:00000000
[HKEY_LOCAL_MACHINE\SYSTEM\CurrentControlSet\Control\SecurityProviders\SCHANNEL\Ciphers\RC4 64/128]
“Enabled”=dword:00000000
[HKEY_LOCAL_MACHINE\SYSTEM\CurrentControlSet\Control\SecurityProviders\SCHANNEL\Ciphers\Triple DES 168/168]
“Enabled”=dword:ffffffff
[HKEY_LOCAL_MACHINE\SYSTEM\CurrentControlSet\Control\SecurityProviders\SCHANNEL\Hashes\MD5]
“Enabled”=dword:00000000
[HKEY_LOCAL_MACHINE\SYSTEM\CurrentControlSet\Control\SecurityProviders\SCHANNEL\Hashes\SHA]
“Enabled”=dword:ffffffff
[HKEY_LOCAL_MACHINE\SYSTEM\CurrentControlSet\Control\SecurityProviders\SCHANNEL\KeyExchangeAlgorithms\PKCS]
“Enabled”=dword:ffffffff
[HKEY_LOCAL_MACHINE\SYSTEM\CurrentControlSet\Control\SecurityProviders\SCHANNEL\Protocols\PCT 1.0\Client]
“Enabled”=dword:00000000
[HKEY_LOCAL_MACHINE\SYSTEM\CurrentControlSet\Control\SecurityProviders\SCHANNEL\Protocols\PCT 1.0\Server]
“Enabled”=dword:00000000
[HKEY_LOCAL_MACHINE\SYSTEM\CurrentControlSet\Control\SecurityProviders\SCHANNEL\Protocols\SSL 2.0\Client]
“Enabled”=dword:00000000
[HKEY_LOCAL_MACHINE\SYSTEM\CurrentControlSet\Control\SecurityProviders\SCHANNEL\Protocols\SSL 2.0\Server]
“Enabled”=dword:00000000
[HKEY_LOCAL_MACHINE\SYSTEM\CurrentControlSet\Control\SecurityProviders\SCHANNEL\Protocols\SSL 3.0\Client]
“Enabled”=dword:00000000
[HKEY_LOCAL_MACHINE\SYSTEM\CurrentControlSet\Control\SecurityProviders\SCHANNEL\Protocols\SSL 3.0\Server]
“Enabled”=dword:00000000
[HKEY_LOCAL_MACHINE\SYSTEM\CurrentControlSet\Control\SecurityProviders\SCHANNEL\Protocols\TLS 1.0\Client]
“Enabled”=dword:00000001
[HKEY_LOCAL_MACHINE\SYSTEM\CurrentControlSet\Control\SecurityProviders\SCHANNEL\Protocols\TLS 1.0\Server]
“Enabled”=dword:00000001
[HKEY_LOCAL_MACHINE\SYSTEM\CurrentControlSet\Control\SecurityProviders\SCHANNEL\Protocols\TLS 1.2\Client]
“Enabled”=dword:00000001
[HKEY_LOCAL_MACHINE\SYSTEM\CurrentControlSet\Control\SecurityProviders\SCHANNEL\Protocols\TLS 1.2\Server]
“Enabled”=dword:00000001
[HKEY_LOCAL_MACHINE\SYSTEM\CurrentControlSet\Control\SecurityProviders\WDigest]
“Negotiate”=dword:00000000
[HKEY_LOCAL_MACHINE\SYSTEM\CurrentControlSet\Control\SecurityProviders\WDigest]
“UTF8HTTP”=dword:00000001
[HKEY_LOCAL_MACHINE\SYSTEM\CurrentControlSet\Control\SecurityProviders\WDigest]
“UTF8SASL”=dword:00000001
Re-scan a non-compliant PCI scan
You can run a PCI scan between scheduled scan times. If a scheduled PCI scan result is "Non-compliant," and you have addressed the vulnerabilities discovered by the scan, you can use the re-scan feature to determine compliance.
To re-scan a scheduled PCI scan policy:
- At the top of the Alert Logic console, in the drop-down menu, click Scans.
- On the Scans page, click the PCI Compliance tab.
- Click the PCI Scan Result with a status of "Non-compliant."
- Click Re-scan.
Dispute failing vulnerabilities
A PCI scan may report findings that you want to dispute. For example, the scan may identify a vulnerability in your environment that may be a false positive. Or, the scan may identify a vulnerability that you cannot address due to a business or technological constraint but that you could resolve through the use of a compensating control. In these and similar situations, you can dispute the vulnerability through an official dispute process. Alert Logic provides the Alert Logic PCI Dispute system for handling disputes, which you can access directly from your PCI Scan Results report in the Alert Logic console.
When disputing a vulnerability identified in results from an Alert Logic PCI Scan, use the Alert Logic PCI Dispute system; do not submit the dispute to the PCI SSC.
The Alert Logic PCI Dispute system is sometimes referred to as "PCI Referee".
Topics:
- Dispute Types
- How to submit a dispute
- How to review or update a submitted dispute
- Work with the Alert Logic PCI Scan Disputes page
- Dispute statement guidelines and examples
Dispute Types
You can dispute findings in the PCI scan results in the following cases:
- Vulnerability found is incorrect (false positive)
- Vulnerability has a disputed CVSS Base score
- Vulnerability has a compensating control in place
- Exceptions exist in the report
For more information, see PCI Security Standards Council:
- For PCI scan vulnerability disputes, see the ASV Program Guide
- For compensating controls, see the Payment Card Industry (PCI) Data Security Standard. Only companies that have undertaken a risk analysis and have legitimate technological or documented business constraints can consider the use of compensating controls to achieve compliance.
How to submit a dispute
To dispute a vulnerability, you provide an explanation and supporting evidence for the disputed findings, and submit the information for review by an Alert Logic ASV Security Engineer. After you submit your dispute request, the engineer, with whom you can communicate through the PCI Dispute system, reviews the submitted evidence and makes a ruling. The following procedure explains how to submit your dispute using the Alert Logic PCI Dispute system.
To dispute a vulnerability:
- At the top of the Alert Logic console, in the drop-down menu, click Scans.
- On the Scans page, click the PCI Compliance tab.
- Under Latest 25 Reports, click the link for the PCI scan results containing a vulnerability to dispute.
- Under PCI Scan Result, locate the Date and Report ID values. You must provide this information when you contact Alert Logic.
- Click Dispute Results.
The PCI Scan Disputes page appears, displaying the list of identified vulnerabilities. - For each vulnerability, do the following steps:
- Click the box next to the vulnerability.
- Select a dispute type from the drop-down list. The following options are available:
- Dispute Score
- Compensating Control
- False Positive
- Scan Exception
- In the Notes box, type your dispute statement. Review Dispute statement guidelines and examples for guidance when developing your dispute statement.
- (Optional) Click attach file to upload supporting documentation.
The PCI Scan Disputes page provides features that can help when disputing multiple vulnerabilities or vulnerabilities that have been disputed before. For more information, see Work with the Alert Logic PCI Scan Disputes page.
After you have addressed each vulnerability, the Contact Information box appears at the bottom of the page.
- Under Contact Information, enter your information, or the information for the person responsible for PCI accountability.
- Review your dispute content. Make sure each dispute statement is correct and complete. Once you submit a dispute, the statement cannot be modified; you can only add evidence that addresses the statement.
- Click Start Dispute to notify Technical Support of your dispute request. Both you and the designated dispute contact at your company receive confirmation of the dispute request by email.

If you need assistance, call Technical Support (US: (877) 484-8383, EU: +44 (0) 203 011 5533).
How to review or update a submitted dispute
After you submit your dispute, an Alert Logic ASV Security Engineer reviews your request. After the engineer makes a ruling, you will receive an email notification. At that time, you can review the dispute and add further comments.
Once you submit a dispute, the statement cannot be modified; you can only add evidence that addresses the statement.
To review or update a submitted dispute:
- At the top of the Alert Logic console, in the drop-down menu, click Scans.
- On the Scans page, click the PCI Compliance tab.
- Under Latest 25 Reports, click the link for the PCI scan results for which the dispute was requested.
- On the PCI Scan Results page, under Report Downloads, locate the dispute request status banner, and click the provided link.
- The PCI Scan Disputes page appears, where you can review comments, provide updates, and communicate with an Alert Logic ASV Security Engineer.
Work with the Alert Logic PCI Scan Disputes page
The PCI Dispute system is a process for disputing findings in PCI scan results. The Alert Logic PCI Scan Disputes page is the interface for submitting the dispute requests. This topic provides an overview of working with the PCI Scan Disputes page.
- PCI Scan Disputes page overview
- Sort and search content
- Enter dispute type and supporting documentation
- Address multiple exposures in bulk
- Prefill information from previous disputes
- Enter contact information and start dispute
- Communicate with Alert Logic ASV Security Engineer
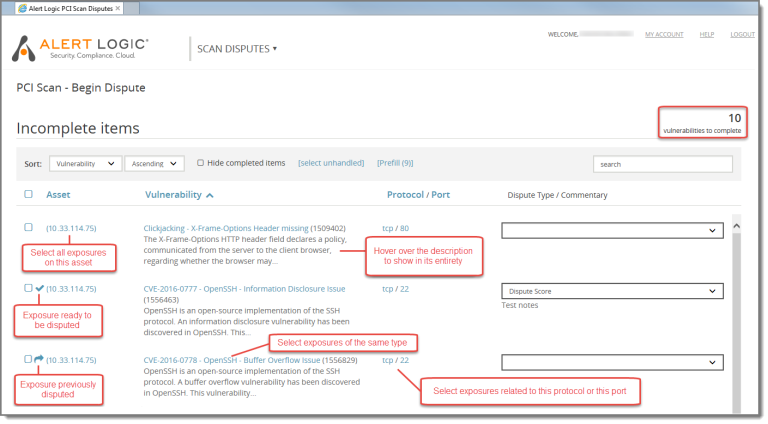
PCI Scan Disputes page overview
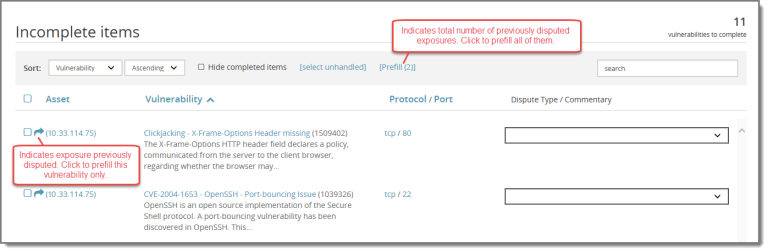
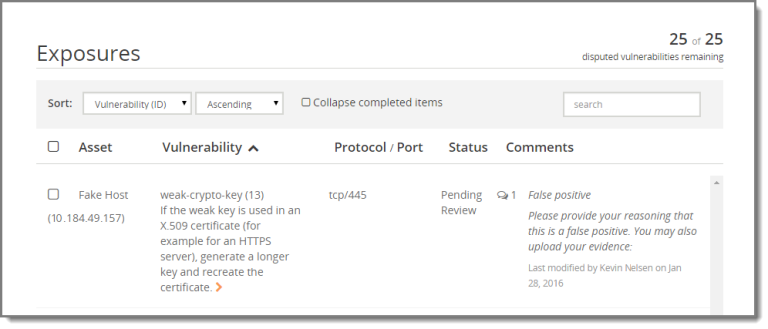
The Alert Logic PCI Scan Disputes page lists all of the failing vulnerabilities identified in your PCI Scan. The following list highlights some of the features of the page:
- A detailed description is provided for each vulnerability. To display the entire description, hover over the description.
- Any exposures that have been disputed in a previous scan are identified with an arrow (
 ). For these items, you can prefill information from the previous disputes.
 - Multiple exposures of the same vulnerability type can be located by clicking the vulnerability link. You can also locate all exposures on a particular asset, on a particular port, or related to a protocol by clicking the respective link. You can then address the similar vulnerabilities in bulk.
- Vulnerabilities that have had supporting documentation entered are ready to be submitted and have a check mark (
 ) next to them.
 - The number of vulnerabilities yet to be addressed is reflected in the upper right corner. All vulnerabilities must be addressed before you can submit your dispute request.
Sort and search content
You can sort the list of vulnerabilities by various parameters, and you can search all content using the search box.
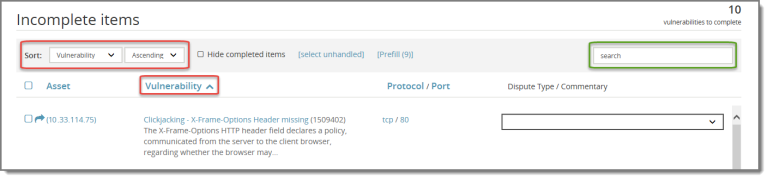
To sort the list of vulnerabilities, use the Sort fields or click a column name. You can sort by the following values:
- Host IP Address / Asset
- Vulnerability
- Service Protocol
- Service Port
- Risk Level (CVSS score). Note: The risk level is not visible on the PCI Scan Disputes page. To see the risk level, hover over the vulnerability to display the entire description, which contains the risk level. You can also generate the PCI Scan Vulnerability Details report.
- Dispute Type
To search the content, type a value in the search box.
Enter dispute type and supporting documentation
For each vulnerability, you must specify a dispute type and supporting documentation. Use the following procedure to enter this information for one vulnerability at a time.
To enter dispute type and supporting documentation:
- Click the box next to the vulnerability.
- Select a dispute type from the drop-down list. The following options are available:
- Dispute Score
- Compensating Control
- False Positive
- Scan Exception
- In the Notes box, type your dispute statement. Review Dispute statement guidelines and examples for guidance when developing your dispute statement.
- (Optional) Click attach file to upload supporting documentation.
After you have entered your supporting documentation, a check mark () appears next to the vulnerability, indicating that it is ready to be disputed. To hide the entry fields, click on the box for the next vulnerability. The number of vulnerabilities to complete is adjusted.

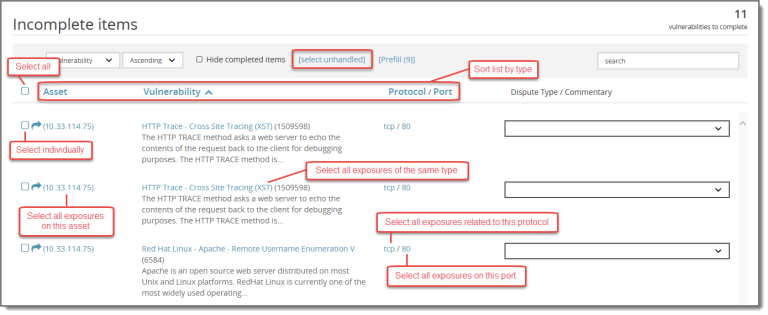
Address multiple exposures in bulk
For vulnerabilities that share the same dispute types and supporting documentation, you can address multiple exposures in bulk.
To address exposures in bulk, first select the vulnerabilities to address. You can select multiple vulnerabilities as follows:
- Select all listed vulnerabilities
- Select all unhandled vulnerabilities
- Select individual vulnerabilities. To organize related vulnerabilities together, you can sort the list by clicking one of the column names: Asset, Vulnerability, Protocol, Port
- Click on a vulnerability link to select all vulnerabilities of that same type. You can also select all exposures on a particular asset, on a particular port, or related to a protocol by clicking the respective link.
When you make your selection of multiple vulnerabilities, the Bulk Operations box appears, displaying the number of exposures selected. To hide the Bulk Operations box, click the arrow.
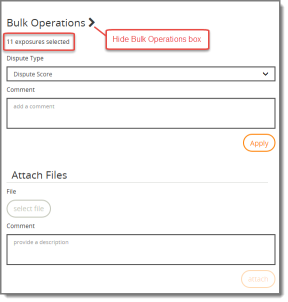
To apply bulk operations:
- Select a dispute type from the drop-down list.
- In the Comment box, type your dispute statement. Review Dispute statement guidelines and examples for guidance when developing your dispute statement.
- (Optional) To upload supporting files:
- Click select file and locate the files to upload.
- In the Comment box, type any supporting comments.
- Click attach.
- Click Apply to enter this information for each selected vulnerability.
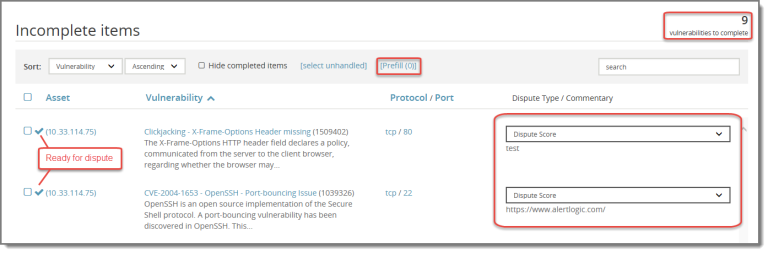
Prefill information from previous disputes
If you have already disputed some of your vulnerabilities, you can re-use the comments submitted in your previous dispute. An arrow () appears next to each of the previously disputed vulnerabilities. You can prefill these vulnerabilities individually, or you can prefill all of them at the same time using the Prefill button. The Prefill button displays the number of previously disputed vulnerabilities.
To prefill information for a single previously disputed vulnerability, click the arrow () next to the vulnerability. To prefill information for all previously disputed vulnerabilities, click Prefill.
The following example shows the results of having used the Prefill button. Comments are copied from your previous disputes for both vulnerabilities, the arrows () change to ready indicators (), and the number of vulnerabilities to complete is adjusted.
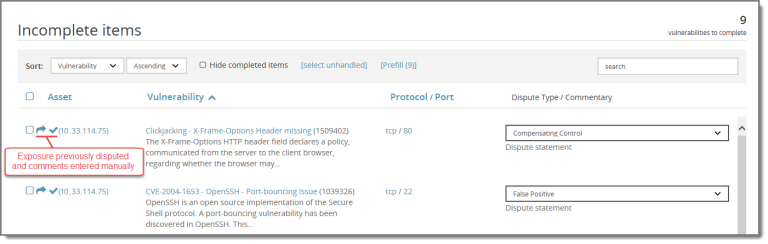
If you manually enter comments for a previously disputed vulnerability rather than using Prefill, the action is reflected with both the arrow and check mark ( ).
).
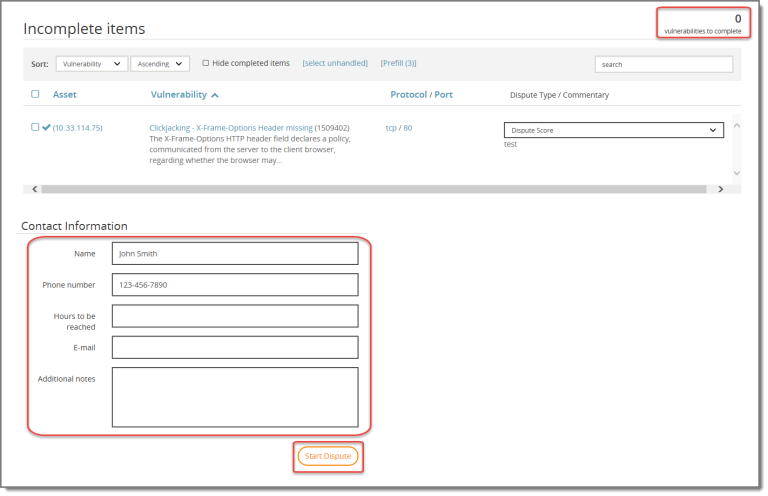
Enter contact information and start dispute
After you have entered comments for all exposures, the Contact Information box appears at the bottom of the page. Enter required Name and Phone number, and any other additional information, and click Start Dispute to submit your dispute request.
Communicate with Alert Logic ASV Security Engineer
After your dispute has been submitted, an Alert Logic ASV Security Engineer reviews your request. If additional information is required, you can communicate within the PCI Dispute system.
Dispute statement guidelines and examples
When you dispute a vulnerability finding, you provide the type of dispute and an explanation for your dispute. Also, if an issue appears with a PCI assessment, the only way to pass the check is to provide an acceptable dispute; PCI does not recognize a justification of the presence of the issue alone as a valid dispute.
Use the following general guidelines when developing your dispute statement:
- Provide detailed, specific information about the reasons you believe the scan result is a false positive.
- Provide proof that you have resolved the scan vulnerability.
- Provide specific information about the operating system, service, or patch level if the issue under dispute is version-specific.
- Do not address a configuration issue by simply claiming to be patched against the issue.
- Do not claim the software in use is the latest version and not include evidence that the version in use does not include the same risk.
- Do not claim a detected plug-in or product version is incorrect and not provide evidence of the difference.
- Make sure the dispute statement is correct and complete before you submit it. Once you file a dispute, the statement cannot be modified; you can only add evidence that addresses the statement.
Examples
The following list provides specific examples that may help you when developing your dispute statement:
- If the issue under dispute is version specific, provide specific information about the operating system, service or patch level :
Incorrect: This does not affect our version of Windows.
Correct: The discovered vulnerability (MS06-057) does not apply to the version of the operating system that we run (MS Windows 2008 R2).
- If the assessment reveals a version of .NET 2.0.xxxx, and you do not use this version of .NET, you must include evidence that .NET 2.0 is not in use.
- If the scan detects a version of a service considered vulnerable, and you use a different version of the service, you must include the version of the service in use.
- If you operate multiple versions of a given daemon on some systems, and a version of a web server is shown as a vulnerable version, you must provide a statement that the version reported by the server itself to the scanner is wrong. Also, you must provide documentation that the service bound to the port is the correct version.
Complete final PCI compliance documentation
After you address all your PCI vulnerabilities, you need to prepare required PCI compliance documentation and submit it to your acquirer. Required PCI compliance documentation includes:
- Final PCI scan reports
- Self-Assessment Questionnaire (SAQ) and Attestation of Compliance
An acquirer is typically the entity, such as a credit card processor, that provides credit card processing services.
To complete final PCI compliance documentation:
- Prepare final PCI scan reports.
- Prepare Self-Assessment Questionnaire and Attestation of Compliance.
- Submit final PCI scan reports, SAQ, and Attestation of Compliance to your acquirer.
Prepare final PCI scan reports
When your PCI scan results are compliant, you can generate your final reports for submission to an acquirer.
To prepare final PCI scan reports:
- At the top of the Alert Logic console, in the drop-down menu, click Scans.
- On the Scans page, click the PCI Compliance tab.
- Under Latest 25 Reports, click the name of the scan results to submit to your acquirer. The scan results must have a status of compliant.
- Under Report Downloads, click each of the following reports to generate and download:
- Executive Summary
- Vulnerability Details
- Attestation of scan compliance
The Vulnerability Details report is available as a .csv file in addition to the PDF download. The .csv file includes less detail than the PDF, but the information is easy to view and analyze in a spreadsheet.
If you want to send feedback to the PCI SSC regarding your scanning experience, your experience with Alert Logic, or any other aspects of PCI scans, click the PCI ASV Feedback Form link below the list of reports.
Prepare Self-Assessment Questionnaire and Attestation of Compliance
To validate compliance with PCI DSS, you must submit a Self-Assessment Questionnaire and Attestation of Compliance with your final PCI scan reports. You can obtain the required documents from the PCI SSC, as described in the following procedure.
To prepare the Self-Assessment Questionnaire and Attestation of Compliance:
- Use the guidelines provided in the table on the PCI SSC website to determine the appropriate questionnaire for your company. Note the letter code for the questionnaire.
- Referencing the letter code, locate and download the appropriate questionnaire from the PCI SSC document library. You can choose DOC or PDF format.
- Complete the questionnaire.