Scans
A scan detects and identifies network and host vulnerabilities in your environment. Scans can perform external attack simulations as well as comprehensive vulnerability checks including registry evaluation. Alert Logic scans can also help you meet PCI compliance requirements.
This topic describes the types of scans that are supported, best practices for running successful scans, and how to configure and manage scan definitions and results. A suggested workflow for using Alert Logic vulnerability scans to meet your PCI compliance requirements is also provided.
Scan types
The following table describes the types of supported scans:
| Scan Type | Description |
|---|---|
| internal | An internal scan runs from an Alert Logic appliance in your environment. When you define a scan, you can specify credentials to use with the internal scan. If you provide credentials, Threat Manager can log on to each host on your network and collect information about the host while it performs comprehensive vulnerability checks including registry setting evaluation. If you do not provide credentials, Threat Manager scans your network without logging on to each host and performs as many checks as possible. |
| external | An external scan runs from the Alert Logic data centers against your environment. This type of scan simulates attacks from outside your network and identifies potential issues from these attack types. |
| PCI | A PCI scan is a special type of external scan that is used specifically for Payment Card Industry (PCI) compliance requirements. |
Scanning best practices
When configuring your scans, use the following guidelines to create successful scans and scan results.
Request authorization before scanning cloud-based assets
AWS
Alert Logic performs vulnerability scans, not penetration testing. AWS treats scanning the same as penetration testing, requiring scan clients to fill out and submit a penetration testing request form. This authorization allows AWS to differentiate between testing and a real attack on their systems.
The process and form for requesting authorization from AWS are located here.
Azure
While Azure does not require pre-approval for scanning, clients must comply with their terms and are encouraged to fill out and submit a penetration testing notification form.
The terms and notification form from Microsoft are located here.
Be smart when scheduling scans
Schedule your scans to be both effective and efficient.
- Scan your servers, firewalls, and routers during off-peak times. To effectively balance scanning resources across your enterprise, configure scanning of data center assets to occur during off-peak times.
- Do not scan during service windows. Service windows are the times when you do backups, hardware maintenance, or apply patches. Valid scan results require that the server is powered on and not in the middle of a reboot. For best results, scan after you apply patches and not while applying patches.
- Scan your workstations during working hours. At night, laptops go home and workstations get powered off. Scan laptops and workstations when they are available on your network.
- Scan new computers before use. Scan new servers before you plug in to the Internet. Time to infection for an unpatched, unprotected server can be less than an hour.
- Scan often. Security is a moving target that you cannot hit in three month scan intervals. Establish a reasonable schedule that scans as frequently as possible and can be adhered to.
Make sure your scans have time to complete
An incomplete scan yields incomplete results. If your scans cannot finish, you may have undetected vulnerabilities. To get a comprehensive vulnerability assessment, it is imperative that all scans—no matter how lengthy—run to completion. You can affect your scanning throughput by either modifying scan definitions or by increasing scanning capability, as follows:
- Open your scan window. Because of improvements in scanning technologies, you do not necessarily need to limit your scanning activities to narrow time frames during off-peak hours. It is generally safe to let your scan run during normal business hours without impact to performance or availability of assets. Many customers run their scans continuously.
- Run open-ended scans. When scheduling your scan, consider leaving the scan end time blank.
- Split up long scans. Rather than a single, comprehensive scan, use multiple scans. Set several smaller scopes and spread the load across multiple scanners.
- Run scanners in parallel. If you have multiple appliances, you can run scans in parallel. Running scans in parallel requires spreading scans across multiple appliances.
If scans are taking an unusually long time to complete, there may be other local factors involved. Factors include:
- Back-end database speed
- Network connection or infrastructure issues
- Number of simultaneous connections by the scanner
- Number of vulnerability checks
- Client computer/server performance and response time
Know what to scan
Consider what to scan and how often to scan it. Your scanning strategy might require multiple scan definitions with different schedules and frequencies.
- Scan common ports often, and all ports less often. Use the following recommendations:
- Scan common TCP and UDP ports often, at least once a week. Almost all new vulnerabilities appear on common TCP and UDP ports.
- Use authenticated scanning on common ports. This is the best way to lower scan times, reduce false positives, and detect the latest vulnerabilities.
Scan all ports infrequently. Scanning all TCP ports and all UDP ports is time-consuming and has minimal benefit over scanning common TCP and common UDP ports.
As a general best practice, on external systems, disable all UDP ports at the host level, the firewall level, and the router level. Unless you have a specific reason, do not have open UDP ports on your internet-facing systems.
Scan frequency recommendations:
Scan frequency Common TCP and UDP ports Typically Vulnerable TCP and UDP ports All TCP and UDP ports Internal scan External scan Internal scan External scan Internal scan External scan Daily x Weekly x x Monthly x x Quarterly x After configuration change x x Suspicion of break or infection x x
- Do not scan "all ports open" configurations commonly found on firewalls. To improve security posture, some users implement firewall or router configurations that are designed to slow scans. These configurations are designed specifically to slow down an attacker but will slow down your scans as well. Scanning targets with these types of configurations should not be done as part of regular scanning, but should be scanned individually using an outside vendor tool to assess the effectiveness of the protection mechanism. If you decide to use this protection mechanism, ensure that Alert Logic appliances and external scanners are whitelisted and not affected by the protection mechanism.
- Configure personal firewalls to allow access by scanner. Where personal firewalls are used for desktops or workstations, credential-based scans are not possible without configuration setting changes. Configure Windows firewalls to allow scanner access on Windows Management Instrumentation (WMI), configure your Linux box to allow access via SSH, and then run a credentialed scan.
- Define reasonable, non-overlapping scopes.
- Scan a range of 256–1024 IP addresses at a time. Scanning large IP address ranges (for example, 10.0.0.0/9) will send large amounts of unnecessary traffic to your network which might cause the scan to fail.
- Avoid configuring multiple scans that overlap IP address ranges. This creates redundant results and extends scan times.
- Scan DMZ, internal servers, and workstations separately, as they will likely need different levels of attention. Also, consider limiting scope by role (for example, database, web, application, QA, test, development, production).
Optimize your scans
When setting up your scans, consider your strategy. Develop an implementation that is particular to your scanning targets and environment.
- Establish your initial scan window. The time required to complete a scan is greatly dependent on the types of scans you run as well as environmental factors like hosts and bandwidth. If you must set an end time and want to determine the scan window requirements, run a one-off scan without an end time to establish the initial duration, and then add 20-30 percent more time to accommodate future growth. If the scan takes longer than you want, consider reducing scan scope and spreading scans across multiple appliances to reduce time.
- Be mindful of what you are scanning. In terms of length, not all types of scans are equal. Windows-credentialed scanning takes longer than all other credentialed or non-credentialed scans. Under test scenarios, Windows-credentialed scans have taken up to four times as long as other scans. The web application scanning component used in Alert Logic PCI scans can also run long due to the amount of web pages present and the number of fields on each page, multiplied by the number of sites being scanned. Consider these factors when defining your scans and determining scan windows.
- Multitask. Scan your servers and workstations separately in a staggered schedule to allow remediation in stages. For example, you can perform remediation on servers while scans on workstations continue to run.
- Try not to scan over WAN links or VPN. The traffic between the scanner and the scan target is high compared to the relatively low traffic between the scanner and Alert Logic. Place the scanner on the same side of the VPN or WAN link as the scan target for the best use of your bandwidth.
- Use un-credentialed scans as fallback. Credentialed scans produce the most accurate results and should be used on all servers and workstations. Un-credentialed scans should be used only for devices where credentialed scanning is not available, for example, routers, switches, and printers.
Originating IP addresses for scanning
The following table contains the broad range of IP addresses owned by Alert Logic for existing and future use. Alert Logic scanning technologies use a specific subset of these IP addresses for scan origination. Make sure that your active protective mechanisms, such as IDS, IPS, WAFs, and firewalls that can send shun/block requests, to allow scanning traffic from all of the following IP addresses.
| IP/CIDR | # of addresses | Included addresses |
|---|---|---|
| 204.110.218.0/23 | 512 | 204.110.218.0 — 204.110.219.255 |
| 208.71.208.0/22 | 1024 | 208.71.208.0 — 208.71.211.255 |
| 185.54.124.0/22 | 1024 | 185.54.124.0 — 185.54.127.255 |
Access Alert Logic scans
You can access most scan-related features from the Scans page in the Alert Logic console. These features include creating and scheduling scans, managing scan results, and processing steps for PCI compliance.
To access scans and scan results:
- In the Alert Logic console, click OVERVIEW, and then click Scans.
- On the Scans page, use the tabs to access scan features, as follows:
- Statistics: Access summarized vulnerability information for your environment from overall scan results. See View vulnerability statistics.
- Scans: Create and update scan definitions and access scan results.
- PCI Compliance: Create PCI scans and access PCI scan results. See Manage PCI scans.
- Search: Search scan results for criteria such as vulnerability name and risk levels. See Search scan results.
Manage scans
You can access detailed information about network and host vulnerabilities discovered during internal and external scans from the Scans tab on the Scans page in the Alert Logic console. From the Scans tab, you can create new scans, edit existing scan definitions, and view scan results.

For information about PCI scans, see Manage PCI scans.
View scans
From the Scans tab on the Scans page, you can view scheduled vulnerability scans, scan status and results, and links to disable, enable, and delete the scans.
To view vulnerability scans:
- On the Scans page, click the Scans tab.
- If you manage more than one customer, in the Customer drop-down list, select the customer, and then click Go.
Scheduled scans, scan status and results, and links to disable, enable, and delete the scans are displayed. - (Optional) To change the definition of a scan, see Modify scan definition.
- (Optional) To change the status of a scan, see Modify scan status.
Define a scan
You can define and schedule scans to run on a regular basis to help you identify vulnerabilities across your organization. From the Scans tab, you can define and schedule internal and external scans.
For information about setting up PCI scans, see Manage PCI scans.
Create a new scan
- On the Scans page, click the Scans tab.
- If you have access to more than one entity, use the drop down menu to select the entity you want to scan.
- Click Schedule New Scan.
- Fill in the information according to the instructions below.
- Click Submit scan job.
Scan Details
- In Scan Title, type a descriptive name for the scan.
- In the Type of Scan drop-down list, select one of the following options:
- Internal Scan: This scan originates inside your network, behind your firewall, and shows an insider threat perspective.
- External Scan: This scan originates from Alert Logic, outside your network, and shows an outside threat perspective.
- If you chose Internal Scan, choose Appliances for your scan. The Unavailable Appliances box lists all appliances that are offline or deactivated. If you chose External Scan, the Appliances option is not available.
- Under How to Scan, choose one of the following options:
- Full Scan is a complete scan on all in-scope devices.
- Uphost only scan is a scan that detects only the alive/offline status of each host.
What to Scan
Choose whether to scan by Zones, Host Groups, or Individual IPs, and then choose the appropriate item(s) from the list that appears.
- Zones are created around Alert Logic appliances. Set up zones on the Management page.
- Choose one or more zones from the list. Press and hold the Ctrl key to select multiple items. To select adjacent items, click the first item, press and hold the Shift key, and then click the last item.
- Host Groups are sets of one or more hosts. Multiple host groups may reside within a single zone. Set up host groups on the Management page.
- Choose one or more host groups from the list. Press and hold the Ctrl key to select multiple items. To select adjacent items, click the first item, press and hold the Shift key, and then click the last item.
- Individual IPs allow you to select the specific IPs to scan.
- You may enter addresses, subnets, or address ranges. When you are done typing the information, click Add the above hosts to the scan to add them to the list. You may add more hosts or remove them from the list.
Scan Credentials
Enter user credential information to ensure the scanner has access to all necessary parts of your network. Alert Logic recommends adding user credentials for the most accurate scan. The prompt accepts information for Windows Credentials, SSH Credentials, and SNMP Community Names. For more information on authenticated scanning, click here.
If you selected an External or Uphost only scan under Scan Details, you can not enter user credentials.
In the Port Scan Options menu, choose one or more port groups to scan, or enter a list of custom ports. Make a selection from the drop-down list and then click Add port selection. The table below the drop-down menu shows the port groups you selected and indicates if they are Fast or Heavy scans. You may add more groups or remove them from the list.
Enter custom port lists either as a range (e.g., 1-10001) or as a comma separated list (e.g., 11234, 11311, 12000, 12010)
If you want a custom set of both TCP and UDP ports, select Custom TCP Ports and list your ports, and then click Add port selection. Repeat the process to add your list of Custom UDP Ports.
Scan frequency recommendations:
| Scan frequency | Common TCP and UDP ports | Typically Vulnerable TCP and UDP ports | All TCP and UDP ports | |||
|---|---|---|---|---|---|---|
| Internal scan | External scan | Internal scan | External scan | Internal scan | External scan | |
| Daily | x | |||||
| Weekly | x | x | ||||
| Monthly | x | x | ||||
| Quarterly | x | |||||
| After configuration change | x | x | ||||
| Suspicion of break or infection | x | x | ||||
| Port group name | TCP ports | UDP ports |
|---|---|---|
| Typically Vulnerable TCP (10,071) & UDP (108) Ports | 1-10001, 10008, 10110, 10202-10203, 11234, 11311, 12000, 12010, 12168, 12174, 12221, 12345, 12397, 12401, 12754, 13701, 13722, 13724, 13782, 13838, 14206, 14247, 14942, 15104, 16102, 16388, 16660, 17000, 17781, 18264, 18302, 19300, 20031, 20101, 20222, 20432, 21700, 23472, 25072, 27017, 27374, 27665, 28017, 29005, 32982, 33270, 33567-33568, 34443-34444, 36010, 36794, 36890, 37452, 38292, 40080, 40180, 41002, 4 1080, 41443, 41523, 42800, 50000-50001, 51100, 54345, 55555, 57772, 60008, 62078 | 7, 9, 17, 19, 49, 53, 67, 68, 69, 80, 88, 103, 104, 105, 111, 120, 123, 135, 136, 137, 138, 139,158, 161, 162, 177, 427, 443, 445, 497, 500, 514, 515, 518, 520, 593, 601, 623, 626, 631, 660996, 997, 998, 999, 1022, 1023, 1025, 1026, 1027, 1028, 1029, 1030, 1433, 1434, 1645,1646, 1701, 1718, 1719, 1812, 1813, 1900, 2000, 2048, 2049, 2222, 2223, 3283, 3456,3703, 4444, 4500, 5000, 5060, 5353, 5632, 9200, 10000, 17185, 20031, 30718, 31337,32768, 32769, 32771, 32815, 33281, 49152, 49153, 49154, 49156, 49181, 49182, 49185,49186, 49188, 49190, 49191, 49192, 49193, 49194, 49200, 49201, 50924, 51704, 52768, 65024 |
| Typically Vulnerable TCP Ports (10,071) | 1-10001, 10008, 10110, 10202-10203, 11234, 11311, 12000, 12010, 12168, 12174, 12221, 12345, 12397, 12401, 12754, 13701, 13722, 13724, 13782, 13838, 14206, 14247, 14942, 15104, 16102, 16388, 16660, 17000, 17781, 18264, 18302, 19300, 20031, 20101, 20222, 20432, 21700, 23472, 25072, 27017, 27374, 27665, 28017, 29005, 32982, 33270, 33567-33568, 34443-34444, 36010, 36794, 36890, 37452, 38292, 40080, 40180, 41002, 4 1080, 41443, 41523, 42800, 50000-50001, 51100, 54345, 55555, 57772, 60008, 62078 | None |
| Common TCP (1,000) & UDP (108) Ports | 1, 3, 4, 6, 7, 9, 13, 17, 19, 20, 21, 22, 23, 24, 25, 26, 30, 32, 33, 37, 42, 43, 49, 53, 70, 79, 80, 81, 82, 83, 84, 85, 88, 89, 90, 99, 100, 106, 109, 110, 111, 113, 119, 125, 135, 139, 143, 144, 146, 161, 163, 179, 199, 211, 212, 222, 254, 255, 256, 259, 264, 280, 301, 306, 311, 340, 366, 389, 406, 407, 416, 417, 425, 427, 443, 444, 445, 458, 464, 465, 481, 497, 500, 512, 513, 514, 515, 524, 541, 543, 544, 545, 548, 554, 555, 563, 587, 593, 616, 617, 625, 631, 636, 646, 648, 666, 667, 668, 683, 687, 691, 700, 705, 711, 714, 720, 722, 726, 749, 765, 777, 783, 787, 800, 801, 808, 843, 873, 880, 888, 898, 900, 901, 902, 903, 911, 912, 981, 987, 990, 992, 993, 995, 999, 1000, 1001, 1002, 1007, 1009, 1010, 1011, 1021, 1022, 1023, 1024, 1025, 1026, 1027, 1028, 1029, 1030, 1031, 1032, 1033, 1034, 1035, 1036, 1037, 1038, 1039, 1040, 1041, 1042, 1043, 1044, 1045, 1046, 1047, 1048, 1049, 1050, 1051, 1052, 1053, 1054, 1055, 1056, 1057, 1058, 1059, 1060, 1061, 1062, 1063, 1064, 1065, 1066, 1067, 1068, 1069, 1070, 1071, 1072, 1073, 1074, 1075, 1076, 1077, 1078, 1079, 1080, 1081, 1082, 1083, 1084, 1085, 1086, 1087, 1088, 1089, 1090, 1091, 1092, 1093, 1094, 1095, 1096, 1097, 1098, 1099, 1100, 1102, 1104, 1105, 1106, 1107, 1108, 1110, 1111, 1112, 1113, 1114, 1117, 1119, 1121, 1122, 1123, 1124, 1126, 1130, 1131, 1132, 1137, 1138, 1141, 1145, 1147, 1148, 1149, 1151, 1152, 1154, 1163, 1164, 1165, 1166, 1169, 1174, 1175, 1183, 1185, 1186, 1187, 1192, 1198, 1199, 1201, 1213, 1216, 1217, 1218, 1233, 1234, 1236, 1244, 1247, 1248, 1259, 1271, 1272, 1277, 1287, 1296, 1300, 1301, 1309, 1310, 1311, 1322, 1328, 1334, 1352, 1417, 1433, 1434, 1443, 1455, 1461, 1494, 1500, 1501, 1503, 1521, 1524, 1533, 1556, 1580, 1583, 1594, 1600, 1641, 1658, 1666, 1687, 1688, 1700, 1717, 1718, 1719, 1720, 1721, 1723, 1755, 1761, 1782, 1783, 1801, 1805, 1812, 1839, 1840, 1862, 1863, 1864, 1875, 1900, 1914, 1935, 1947, 1971, 1972, 1974, 1984, 1998, 1999, 2000, 2001, 2002, 2003, 2004, 2005, 2006, 2007, 2008, 2009, 2010, 2013, 2020, 2021, 2022, 2030, 2033, 2034, 2035, 2038, 2040, 2041, 2042, 2043, 2045, 2046, 2047, 2048, 2049, 2065, 2068, 2099, 2100, 2103, 2105, 2106, 2107, 2111, 2119, 2121, 2126, 2135, 2144, 2160, 2161, 2170, 2179, 2190, 2191, 2196, 2200, 2222, 2251, 2260, 2288, 2301, 2323, 2366, 2381, 2382, 2383, 2393, 2394, 2399, 2401, 2492, 2500, 2522, 2525, 2557, 2601, 2602, 2604, 2605, 2607, 2608, 2638, 2701, 2702, 2710, 2717, 2718, 2725, 2800, 2809, 2811, 2869, 2875, 2909, 2910, 2920, 2967, 2968, 2998, 3000, 3001, 3003, 3005, 3006, 3007, 3011, 3013, 3017, 3030, 3031, 3052, 3071, 3077, 3128, 3168, 3211, 3221, 3260, 3261, 3268, 3269, 3283, 3300, 3301, 3306, 3322, 3323, 3324, 3325, 3333, 3351, 3367, 3369, 3370, 3371, 3372, 3389, 3390, 3404, 3476, 3493, 3517, 3527, 3546, 3551, 3580, 3659, 3689, 3690, 3703, 3737, 3766, 3784, 3800, 3801, 3809, 3814, 3826, 3827, 3828, 3851, 3869, 3871, 3878, 3880, 3889, 3905, 3914, 3918, 3920, 3945, 3971, 3986, 3995, 3998, 4000, 4001, 4002, 4003, 4004, 4005, 4006, 4045, 4111, 4125, 4126, 4129, 4224, 4242, 4279, 4321, 4343, 4443, 4444, 4445, 4446, 4449, 4550, 4567, 4662, 4848, 4899, 4900, 4998, 5000, 5001, 5002, 5003, 5004, 5009, 5030, 5033, 5050, 5051, 5054, 5060, 5061, 5080, 5087, 5100, 5101, 5102, 5120, 5190, 5200, 5214, 5221, 5222, 5225, 5226, 5269, 5280, 5298, 5357, 5405, 5414, 5431, 5432, 5440, 5500, 5510, 5544, 5550, 5555, 5560, 5566, 5631, 5633, 5666, 5678, 5679, 5718, 5730, 5800, 5801, 5802, 5810, 5811, 5815, 5822, 5825, 5850, 5859, 5862, 5877, 5900, 5901, 5902, 5903, 5904, 5906, 5907, 5910, 5911, 5915, 5922, 5925, 5950, 5952, 5959, 5960, 5961, 5962, 5963, 5987, 5988, 5989, 5998, 5999, 6000, 6001, 6002, 6003, 6004, 6005, 6006, 6007, 6009, 6025, 6059, 6100, 6101, 6106, 6112, 6123, 6129, 6156, 6346, 6389, 6502, 6510, 6543, 6547, 6565, 6566, 6567, 6580, 6646, 6666, 6667, 6668, 6669, 6689, 6692, 6699, 6779, 6788, 6789, 6792, 6839, 6881, 6901, 6969, 7000, 7001, 7002, 7004, 7007, 7019, 7025, 7070, 7100, 7103, 7106, 7200, 7201, 7402, 7435, 7443, 7496, 7512, 7625, 7627, 7676, 7741, 7777, 7778, 7800, 7911, 7920, 7921, 7937, 7938, 7999, 8000, 8001, 8002, 8007, 8008, 8009, 8010, 8011, 8021, 8022, 8031, 8042, 8045, 8080, 8081, 8082, 8083, 8084, 8085, 8086, 8087, 8088, 8089, 8090, 8093, 8099, 8100, 8180, 8181, 8192, 8193, 8194, 8200, 8222, 8254, 8290, 8291, 8292, 8300, 8333, 8383, 8400, 8402, 8443, 8500, 8600, 8649, 8651, 8652, 8654, 8701, 8800, 8873, 8888, 8899, 8994, 9000, 9001, 9002, 9003, 9009, 9010, 9011, 9040, 9050, 9071, 9080, 9081, 9090, 9091, 9099, 9100, 9101, 9102, 9103, 9110, 9111, 9200, 9207, 9220, 9290, 9415, 9418, 9485, 9500, 9502, 9503, 9535, 9575, 9593, 9594, 9595, 9618, 9666, 9876, 9877, 9878, 9898, 9900, 9917, 9929, 9943, 9944, 9968, 9998, 9999, 10000, 10001, 10002, 10003, 10004, 10009, 10010, 10012, 10024, 10025, 10082, 10180, 10215, 10243, 10566, 10616, 10617, 10621, 10626, 10628, 10629, 10778, 11110, 11111, 11967, 12000, 12174, 12265, 12345, 13456, 13722, 13782, 13783, 14000, 14238, 14441, 14442, 15000, 15002, 15003, 15004, 15660, 15742, 16000, 16001, 16012, 16016, 16018, 16080, 16113, 16992, 16993, 17877, 17988, 18040, 18101, 18988, 19101, 19283, 19315, 19350, 19780, 19801, 19842, 20000, 20005, 20031, 20221, 20222, 20828, 21571, 22939, 23502, 24444, 24800, 25734, 25735, 26214, 27000, 27352, 27353, 27355, 27356, 27715, 28201, 30000, 30718, 30951, 31038, 31337, 32768, 32769, 32770, 32771, 32772, 32773, 32774, 32775, 32776, 32777, 32778, 32779, 32780, 32781, 32782, 32783, 32784, 32785, 33354, 33899, 34571, 34572, 34573, 35500, 38292, 40193, 40911, 41511, 42510, 44176, 44442, 44443, 44501, 45100, 48080, 49152, 49153, 49154, 49155, 49156, 49157, 49158, 49159, 49160, 49161, 49163, 49165, 49167, 49175, 49176, 49400, 49999, 50000, 50001, 50002, 50003, 50006, 50300, 50389, 50500, 50636, 50800, 51103, 51493, 52673, 52822, 52848, 52869, 54045, 54328, 55055, 55056, 55555, 55600, 56737, 56738, 57294, 57797, 58080, 60020, 60443, 61532, 61900, 62078, 63331, 64623, 64680, 65000, 65129, 65389 | 7, 9, 17, 19, 49, 53, 67, 68, 69, 80, 88, 103, 104, 105, 111, 120, 123, 135, 136, 137, 138, 139,158, 161, 162, 177, 427, 443, 445, 497, 500, 514, 515, 518, 520, 593, 601, 623, 626, 631, 660996, 997, 998, 999, 1022, 1023, 1025, 1026, 1027, 1028, 1029, 1030, 1433, 1434, 1645,1646, 1701, 1718, 1719, 1812, 1813, 1900, 2000, 2048, 2049, 2222, 2223, 3283, 3456,3703, 4444, 4500, 5000, 5060, 5353, 5632, 9200, 10000, 17185, 20031, 30718, 31337,32768, 32769, 32771, 32815, 33281, 49152, 49153, 49154, 49156, 49181, 49182, 49185,49186, 49188, 49190, 49191, 49192, 49193, 49194, 49200, 49201, 50924, 51704, 52768, 65024 |
| Common UDP Ports (108) | None | 7, 9, 17, 19, 49, 53, 67, 68, 69, 80, 88, 103, 104, 105, 111, 120, 123, 135, 136, 137, 138, 139,158, 161, 162, 177, 427, 443, 445, 497, 500, 514, 515, 518, 520, 593, 601, 623, 626, 631, 660996, 997, 998, 999, 1022, 1023, 1025, 1026, 1027, 1028, 1029, 1030, 1433, 1434, 1645,1646, 1701, 1718, 1719, 1812, 1813, 1900, 2000, 2048, 2049, 2222, 2223, 3283, 3456,3703, 4444, 4500, 5000, 5060, 5353, 5632, 9200, 10000, 17185, 20031, 30718, 31337,32768, 32769, 32771, 32815, 33281, 49152, 49153, 49154, 49156, 49181, 49182, 49185,49186, 49188, 49190, 49191, 49192, 49193, 49194, 49200, 49201, 50924, 51704, 52768, 65024 |
| Common TCP Ports (1,000) | 1, 3, 4, 6, 7, 9, 13, 17, 19, 20, 21, 22, 23, 24, 25, 26, 30, 32, 33, 37, 42, 43, 49, 53, 70, 79, 80, 81, 82, 83, 84, 85, 88, 89, 90, 99, 100, 106, 109, 110, 111, 113, 119, 125, 135, 139, 143, 144, 146, 161, 163, 179, 199, 211, 212, 222, 254, 255, 256, 259, 264, 280, 301, 306, 311, 340, 366, 389, 406, 407, 416, 417, 425, 427, 443, 444, 445, 458, 464, 465, 481, 497, 500, 512, 513, 514, 515, 524, 541, 543, 544, 545, 548, 554, 555, 563, 587, 593, 616, 617, 625, 631, 636, 646, 648, 666, 667, 668, 683, 687, 691, 700, 705, 711, 714, 720, 722, 726, 749, 765, 777, 783, 787, 800, 801, 808, 843, 873, 880, 888, 898, 900, 901, 902, 903, 911, 912, 981, 987, 990, 992, 993, 995, 999, 1000, 1001, 1002, 1007, 1009, 1010, 1011, 1021, 1022, 1023, 1024, 1025, 1026, 1027, 1028, 1029, 1030, 1031, 1032, 1033, 1034, 1035, 1036, 1037, 1038, 1039, 1040, 1041, 1042, 1043, 1044, 1045, 1046, 1047, 1048, 1049, 1050, 1051, 1052, 1053, 1054, 1055, 1056, 1057, 1058, 1059, 1060, 1061, 1062, 1063, 1064, 1065, 1066, 1067, 1068, 1069, 1070, 1071, 1072, 1073, 1074, 1075, 1076, 1077, 1078, 1079, 1080, 1081, 1082, 1083, 1084, 1085, 1086, 1087, 1088, 1089, 1090, 1091, 1092, 1093, 1094, 1095, 1096, 1097, 1098, 1099, 1100, 1102, 1104, 1105, 1106, 1107, 1108, 1110, 1111, 1112, 1113, 1114, 1117, 1119, 1121, 1122, 1123, 1124, 1126, 1130, 1131, 1132, 1137, 1138, 1141, 1145, 1147, 1148, 1149, 1151, 1152, 1154, 1163, 1164, 1165, 1166, 1169, 1174, 1175, 1183, 1185, 1186, 1187, 1192, 1198, 1199, 1201, 1213, 1216, 1217, 1218, 1233, 1234, 1236, 1244, 1247, 1248, 1259, 1271, 1272, 1277, 1287, 1296, 1300, 1301, 1309, 1310, 1311, 1322, 1328, 1334, 1352, 1417, 1433, 1434, 1443, 1455, 1461, 1494, 1500, 1501, 1503, 1521, 1524, 1533, 1556, 1580, 1583, 1594, 1600, 1641, 1658, 1666, 1687, 1688, 1700, 1717, 1718, 1719, 1720, 1721, 1723, 1755, 1761, 1782, 1783, 1801, 1805, 1812, 1839, 1840, 1862, 1863, 1864, 1875, 1900, 1914, 1935, 1947, 1971, 1972, 1974, 1984, 1998, 1999, 2000, 2001, 2002, 2003, 2004, 2005, 2006, 2007, 2008, 2009, 2010, 2013, 2020, 2021, 2022, 2030, 2033, 2034, 2035, 2038, 2040, 2041, 2042, 2043, 2045, 2046, 2047, 2048, 2049, 2065, 2068, 2099, 2100, 2103, 2105, 2106, 2107, 2111, 2119, 2121, 2126, 2135, 2144, 2160, 2161, 2170, 2179, 2190, 2191, 2196, 2200, 2222, 2251, 2260, 2288, 2301, 2323, 2366, 2381, 2382, 2383, 2393, 2394, 2399, 2401, 2492, 2500, 2522, 2525, 2557, 2601, 2602, 2604, 2605, 2607, 2608, 2638, 2701, 2702, 2710, 2717, 2718, 2725, 2800, 2809, 2811, 2869, 2875, 2909, 2910, 2920, 2967, 2968, 2998, 3000, 3001, 3003, 3005, 3006, 3007, 3011, 3013, 3017, 3030, 3031, 3052, 3071, 3077, 3128, 3168, 3211, 3221, 3260, 3261, 3268, 3269, 3283, 3300, 3301, 3306, 3322, 3323, 3324, 3325, 3333, 3351, 3367, 3369, 3370, 3371, 3372, 3389, 3390, 3404, 3476, 3493, 3517, 3527, 3546, 3551, 3580, 3659, 3689, 3690, 3703, 3737, 3766, 3784, 3800, 3801, 3809, 3814, 3826, 3827, 3828, 3851, 3869, 3871, 3878, 3880, 3889, 3905, 3914, 3918, 3920, 3945, 3971, 3986, 3995, 3998, 4000, 4001, 4002, 4003, 4004, 4005, 4006, 4045, 4111, 4125, 4126, 4129, 4224, 4242, 4279, 4321, 4343, 4443, 4444, 4445, 4446, 4449, 4550, 4567, 4662, 4848, 4899, 4900, 4998, 5000, 5001, 5002, 5003, 5004, 5009, 5030, 5033, 5050, 5051, 5054, 5060, 5061, 5080, 5087, 5100, 5101, 5102, 5120, 5190, 5200, 5214, 5221, 5222, 5225, 5226, 5269, 5280, 5298, 5357, 5405, 5414, 5431, 5432, 5440, 5500, 5510, 5544, 5550, 5555, 5560, 5566, 5631, 5633, 5666, 5678, 5679, 5718, 5730, 5800, 5801, 5802, 5810, 5811, 5815, 5822, 5825, 5850, 5859, 5862, 5877, 5900, 5901, 5902, 5903, 5904, 5906, 5907, 5910, 5911, 5915, 5922, 5925, 5950, 5952, 5959, 5960, 5961, 5962, 5963, 5987, 5988, 5989, 5998, 5999, 6000, 6001, 6002, 6003, 6004, 6005, 6006, 6007, 6009, 6025, 6059, 6100, 6101, 6106, 6112, 6123, 6129, 6156, 6346, 6389, 6502, 6510, 6543, 6547, 6565, 6566, 6567, 6580, 6646, 6666, 6667, 6668, 6669, 6689, 6692, 6699, 6779, 6788, 6789, 6792, 6839, 6881, 6901, 6969, 7000, 7001, 7002, 7004, 7007, 7019, 7025, 7070, 7100, 7103, 7106, 7200, 7201, 7402, 7435, 7443, 7496, 7512, 7625, 7627, 7676, 7741, 7777, 7778, 7800, 7911, 7920, 7921, 7937, 7938, 7999, 8000, 8001, 8002, 8007, 8008, 8009, 8010, 8011, 8021, 8022, 8031, 8042, 8045, 8080, 8081, 8082, 8083, 8084, 8085, 8086, 8087, 8088, 8089, 8090, 8093, 8099, 8100, 8180, 8181, 8192, 8193, 8194, 8200, 8222, 8254, 8290, 8291, 8292, 8300, 8333, 8383, 8400, 8402, 8443, 8500, 8600, 8649, 8651, 8652, 8654, 8701, 8800, 8873, 8888, 8899, 8994, 9000, 9001, 9002, 9003, 9009, 9010, 9011, 9040, 9050, 9071, 9080, 9081, 9090, 9091, 9099, 9100, 9101, 9102, 9103, 9110, 9111, 9200, 9207, 9220, 9290, 9415, 9418, 9485, 9500, 9502, 9503, 9535, 9575, 9593, 9594, 9595, 9618, 9666, 9876, 9877, 9878, 9898, 9900, 9917, 9929, 9943, 9944, 9968, 9998, 9999, 10000, 10001, 10002, 10003, 10004, 10009, 10010, 10012, 10024, 10025, 10082, 10180, 10215, 10243, 10566, 10616, 10617, 10621, 10626, 10628, 10629, 10778, 11110, 11111, 11967, 12000, 12174, 12265, 12345, 13456, 13722, 13782, 13783, 14000, 14238, 14441, 14442, 15000, 15002, 15003, 15004, 15660, 15742, 16000, 16001, 16012, 16016, 16018, 16080, 16113, 16992, 16993, 17877, 17988, 18040, 18101, 18988, 19101, 19283, 19315, 19350, 19780, 19801, 19842, 20000, 20005, 20031, 20221, 20222, 20828, 21571, 22939, 23502, 24444, 24800, 25734, 25735, 26214, 27000, 27352, 27353, 27355, 27356, 27715, 28201, 30000, 30718, 30951, 31038, 31337, 32768, 32769, 32770, 32771, 32772, 32773, 32774, 32775, 32776, 32777, 32778, 32779, 32780, 32781, 32782, 32783, 32784, 32785, 33354, 33899, 34571, 34572, 34573, 35500, 38292, 40193, 40911, 41511, 42510, 44176, 44442, 44443, 44501, 45100, 48080, 49152, 49153, 49154, 49155, 49156, 49157, 49158, 49159, 49160, 49161, 49163, 49165, 49167, 49175, 49176, 49400, 49999, 50000, 50001, 50002, 50003, 50006, 50300, 50389, 50500, 50636, 50800, 51103, 51493, 52673, 52822, 52848, 52869, 54045, 54328, 55055, 55056, 55555, 55600, 56737, 56738, 57294, 57797, 58080, 60020, 60443, 61532, 61900, 62078, 63331, 64623, 64680, 65000, 65129, 65389 | None |
| Custom TCP Ports | User-specified | None |
| Custom UDP Ports | None | User-specified |
| All Ports (65,535 TCP ports and 108 UDP ports) | 1-65535 | 7, 9, 17, 19, 49, 53, 67, 68, 69, 80, 88, 103, 104, 105, 111, 120, 123, 135, 136, 137, 138, 139,158, 161, 162, 177, 427, 443, 445, 497, 500, 514, 515, 518, 520, 593, 601, 623, 626, 631, 660996, 997, 998, 999, 1022, 1023, 1025, 1026, 1027, 1028, 1029, 1030, 1433, 1434, 1645,1646, 1701, 1718, 1719, 1812, 1813, 1900, 2000, 2048, 2049, 2222, 2223, 3283, 3456,3703, 4444, 4500, 5000, 5060, 5353, 5632, 9200, 10000, 17185, 20031, 30718, 31337,32768, 32769, 32771, 32815, 33281, 49152, 49153, 49154, 49156, 49181, 49182, 49185,49186, 49188, 49190, 49191, 49192, 49193, 49194, 49200, 49201, 50924, 51704, 52768, 65024 |
Schedule Options
Set the timing of the scan. You may choose to scan once or set a recurring scan that runs quarterly, weekly, or on specific days of the month.
To set scan schedule:
-
Set the scan frequency. Choose from the following options:
- Quarterly: Set the timing of the scans within the quarter:
- Choose the first, second, or third month of the quarter in the Run scan in: drop down menu.
- Set the day of the month in the on this day: text box.
- Every Week:Set the day of the week for the scan to run.
-
Specific Days of the Month: Type in the date(s) you want the scan to run each month.
If you want your scan to run later in the month, you should set it for the 28th at the latest. If you set it for the 31st, you will miss February and the months that have only 30 days.
-
Specific Weekday of the Month
Use the drop down menus to choose the day you want the scan to run each month. For example, you may set it to the second Wednesday every month.
-
One Time
Enter a date to run a single scan.
-
As soon as possible
This option puts the scan in the queue so that it runs as soon as possible.
- Quarterly: Set the timing of the scans within the quarter:
- In the Run scan from: box, set a time for the scan to begin. This option is not available if you chose to run the scan as soon as possible.
- In the Time Zone drop down menu, select a time zone. This option is not available if you chose to run the scan as soon as possible.
Advanced Settings
Click Advanced Settings for more options, if necessary:
- For Scan end time (optional):, set a time for the scan to end. Alert Logic recommends leaving this option empty because it may abort your scan before it is finished.
-
Check the box to Enable roll-over scanning.
Alert Logic discourages using roll-over scanning, as the feature is deprecated.
- If necessary, enter specific IPs in IP Addresses to Exclude.
- You may enter addresses, subnets, or address ranges. When you are done typing the information, click Add the above hosts to scan to add them to the list. You may add more hosts or remove them from the list.
Alert Logic discourages excluding items from your scans.
Scan Report
Check the box to have Alert Logic send an email containing the scan results after the scan completes. Choose email contacts from the list, and add as many as you want.
If you choose to send scan results through email, know that your vulnerability information will be sent as cleartext (unencrypted text) over the Internet via traditional email.
Modify scan definition
After you have created a scan, you can modify its definition. For example, you can change what IP addresses are scanned, when the scan is scheduled to run, or the credentials used to log in to host computers.
To modify a scan definition:
- On the Scans page, click the Scans tab.
- If you manage more than one customer, in the Customer drop-down list, select the customer, and then click Go.
- In the displayed list of scans, click the Scan Title of the scan to modify.
- On the Edit Scan page, modify the scan definition, and then click Save.
Modify scan status
Each defined scan has a status, which is displayed in the list of scans. Scheduled scans that are enabled show a status value of a date (for example, Sep 8 2016 10:00pm), which is when the scan is scheduled to run next. Additional status values include scanning, suspended, and disabled.
You can modify the state of a scheduled scan if needed. For example, to minimize potential risk when you make changes to your network, such as the roll-out of a new version of software on your mission critical servers or devices, you may want to deactivate a scan. The scan remains disabled until you enable it again.
You can also suspend or resume a scan that is in progress, or delete a scan entirely.
To change the next scheduled run date for a scan, which is a part of the scan definition, see Modify scan definition.
To modify scan status:
- On the Scans page, click the Scans tab.
- If you manage more than one customer, in the Customer drop-down list, select the customer, and then click Go.
- Perform one of the following actions in the row of the scan to modify:
- To disable a scheduled scan, click Disable.
- To suspend a scan in progress, click Suspend.
- To resume a suspended scan, click Resume.
- To cancel a suspended scan, click Cancel.
- To delete a scheduled scan, click Delete.
Manage scan results
Through the Scans feature, you can access valuable vulnerability information about your network through your scan results. You can view high-level trend information as well as granular details. Reviewing the details of scan results helps to identify issues you can address to improve your security posture.
View vulnerability statistics
Several types of trend views are provided to help you better understand your recent activity at a high level.
If you manage more than one customer, you cannot view the statistics for all of the accounts without logging in to each account individually.
To view vulnerability statistics:
- On the Scans page, click the Statistics tab.
- Select one of the following views to display:
- Most Vulnerable Hosts
- Most Vulnerable Host Groups
- Most Vulnerable Zones
- Vulnerability History
- Vulnerabilities by Risk Level
View results by scan
You can easily view the results for each scan execution. From the results, you can view details about any vulnerabilities that are found. You can also export scan results in PDF or .csv format for download.
To view results by scan:
- On the Scans page, click the Scans tab.
- If you manage more than one customer, in the Customer drop-down list, select the customer, and then click Go.
- A list of scans appears, in alphabetical order by title.
For each scan, you can perform the following actions:
- Enable: Set the scan to run on a set schedule.
- Delete: Delete the scan results from the system.
- Click the link in the Results column to expand the results for the scan. For each Scanned Date row, you can perform the following actions:
- In the Results column, click the linked number of hosts to open a list of hosts and the vulnerabilities for each. Click PCI Scan Results to see the PCI scan page.
-
Click the icons in the Export column to download reports in various formats.
- Click the green CSV icon (
 ) to download a .csv file with vulnerability and exposure details.
 - Click the blue CSV icon (
 ) to download a .csv file with host details.
The industry-standard CSV downloads include detailed host and vulnerability information. The format allows you to analyze, sort, and filter the information externally in the software of your choice. Alert Logic recommends the use of the CSV downloads for all scan analysis.
- Click the green CSV icon (
- Click Delete to delete the scan results. This deletes results from the selected date only.
Search scan results
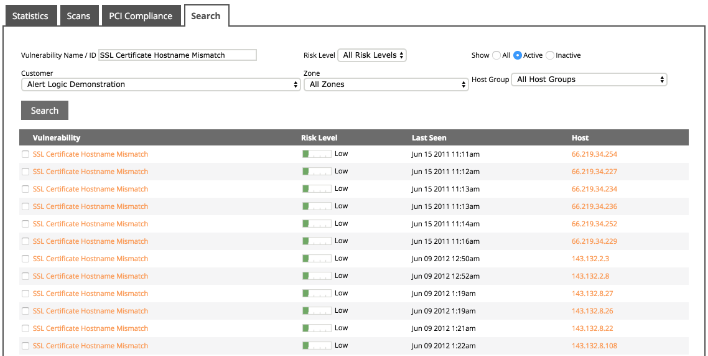
You can search all saved scan results for specific vulnerabilities by name or ID, risk level, zone, and host group. You can also filter your search results by all, active, or inactive vulnerabilities. This feature is useful if you discover a vulnerability and want confirmation, or if you discover a security breach and want to discover the vulnerabilities of a host.
To search scan results:
- On the Scans page, click the Search tab.
- If you manage more than one customer, in the Customer drop-down list, select the customer, and then click Go.
- Enter and select the appropriate options, and then click Search.

Example: A review of your scan results list reveals a vulnerability called "SSL Certificate Hostname Mismatch." You want to know if this vulnerability affects any of your hosts. In the Search tab, in the Vulnerability Name/ID box, enter SSL Certificate Hostname Mismatch, select Active, and then click search. A list of occurrences appears.
Ignore a vulnerability
If you cannot resolve a vulnerability immediately, you can temporarily deactivate the vulnerability. When you deactivate a vulnerability, the Alert Logic console does not remove the vulnerability from reports. You can deactivate vulnerabilities for a specific host or for all hosts.
You cannot deactivate a PCI scan vulnerability.
Example: You want to install a service pack for a database application, but doing so may break other applications that depend on that database application. You can deactivate that vulnerability until you can resolve the related application issues.
To ignore a vulnerability:
- On the Scans page, click the Scans tab.
- If you manage more than one customer, in the Customer drop-down list, select the customer, and then click Go.
- Next to the scan that identifies the vulnerability to deactivate, click and expand Results.
- Under the Results column, next to the date the scan was run, click the hosts link.
- In the Hosts window, under the appropriate host, click the name of the vulnerability.
- Check one or more vulnerabilities you want to deactivate.
- On the bottom right, click Change Status.
- Select one of the following options:
- This Host—Deactivates this vulnerability on this host only.
- All Hosts—Deactivates this vulnerability on all hosts. With this option, you must provide a global descriptive note.
- Select Inactive.
- Click Save.
Report a false positive
Sometimes vulnerability scans identify a vulnerability in your environment that may be a false positive. To investigate an identified vulnerability that may be a false positive, contact Alert Logic. The security analysts in the Alert Logic Security Operations Center (SOC) carefully review the vulnerability and assess the accuracy of the result.
For PCI scans, false positives of High, Critical, or Urgent levels require a dispute. To learn how to dispute a PCI scan false positive, see Dispute failing vulnerabilities.
To report a false positive (for non-PCI scans):
- From the heading of the report that contains the vulnerability in question, find the date the report ran and the Report ID.
- Contact Alert Logic using one of the following options:
- Contact Alert Logic Support at (US) (877) 484-8383 or (EU) +44 (0) 203 011 5533.
- Send an email to support@alertlogic.com.
If the security analyst determines the vulnerability is a false positive, the security analyst updates the vulnerability in the system database.
Clean up scan results
As part of your maintenance activities, you can "clean up" scan results. When you clean up scan results, certain results are hidden in the Alert Logic console, providing you with a cleaner view. You can clean up results predating a specific date, or you can clean up results for individual scans. The hidden results remain in the system and are included in your reports.
Clean up scan results by date
You can hide older scan results from the Alert Logic console by specifying a date and time; results with a Scanned Date that is older than the specified date are hidden.
To clean up scan results by date:
- On the Scans page, click the Scans tab.
- If you manage more than one customer, select the customer in the Customer list, and then click Go.
- Click Clean up Scan Results.
- In the Clean up Scan Results dialog box, enter the date and time before which to hide scan results, specify whether to also hide inactive scans, and then click Clean up.
Clean up scan results by individual scans
You can hide individual scan results from the scan list.
To clean up scan results by individual scans:
- On the Scans page, select the Scans tab.
- If you manage more than one customer, in the Customer drop-down list, select the customer, and then click Go.
- In the row of the scan for which to hide results, click Results.
A list of scan executions appears, ordered by scan date. - For each Scanned Date row, click Delete to hide the results of that particular scan.
Manage PCI scans
Through the Alert Logic console, you can schedule quarterly external scans that are required for Payment Card Industry (PCI) compliance. You can quickly and easily view the results of those scans in the Alert Logic console, and then work with Alert Logic, as needed, to resolve vulnerabilities and prove compliance to auditors.
Working with PCI compliance requires documents available from the PCI Security Standards Council (PCI SSC). Documents include the Payment Card Industry Data Security Standard (DSS) and the current release of the ASV Program Guide.
Review the recommended process
The following procedure outlines the suggested workflow to use Alert Logic vulnerability scans for your PCI compliance requirements.
To use Alert Logic scans for PCI compliance:
- View PCI compliance status and history.
- Schedule a PCI scan.
When you run a PCI scan, Threat Manager generates a preliminary PCI compliance report and sends an e-mail to the configured alert devices. - View PCI compliance status and history.
- If your preliminary PCI compliance report indicates that you are compliant, then complete your final PCI compliance documentation.
- If your preliminary PCI compliance report indicates that you are not compliant, complete the following actions:
- Address PCI compliance vulnerabilities.
- If you have a vulnerability that you believe contains a false positive, contact Technical Support (US:(877) 484-8383, EU: +44 (0) 203 011 5533) to discuss the vulnerability.
- If you have a vulnerability that you cannot address due to a business or technological constraint, dispute the failing vulnerabilities, and then contact Technical Support (US:(877) 484-8383, EU: +44 (0) 203 011 5533) to discuss the vulnerability and any compensating controls in your environment that reduce the risk associated with the vulnerability.
Technical Support requires specific information for PCI scan disputes. Before you contact Technical Support, have the following information ready:
- The PCI compliance report ID number, which you can find in the heading of the PCI compliance report
- The date and time when the PCI compliance report was generated, which you can find in the heading of the PCI compliance report
- Any compensating control documentation associated with the vulnerability before you contact the Alert Logic Security Operations Center (SOC)
- After you address all vulnerabilities and resolve disputes, then complete final PCI compliance documentation.
View PCI compliance status and history
Threat Manager simplifies tracking, analyzing, and documenting your PCI compliance. In the Alert Logic console Scans page, on the PCI Compliance tab, you can view your current and historical PCI compliance status.
By default, your PCI compliance status is "Non-Compliant." The status changes to "Compliant" only after you generate your final PCI compliance report. For more information, see Complete final PCI compliance documentation.
To view your PCI compliance status and history:
- On the Scans page, click the PCI Compliance tab.
A list of the latest PCI scan results are displayed. - To view your most recent PCI compliance scan results, under Latest 25 Reports, click the name of the report to view.
- (Optional) To view a complete archive of your PCI compliance scan results:
- At the top of the Alert Logic console, in the drop-down menu, click Reports.
- In the left navigation pane, expand Archived Reports.
Schedule a PCI scan
When you schedule a PCI scan, Threat Manager runs the scan as specified in the schedule, and then displays the results of the scan in the PCI Compliance tab.
When you schedule a PCI scan, you attest that, at a minimum:
- You are responsible for proper scoping of the scans, and the scan includes all required components for a PCI DSS scope.
- You implemented network segmentation if you excluded any components from PCI DSS scope.
For more information about attestations, see the ASV Program Guide.
To schedule a PCI scan:
- On the Scans page, click the PCI Compliance tab.
- Click Schedule New Scan.
- On the New PCI Scan page, in the Scan Title field, enter a descriptive title for the scan.
- Click the check box if you want to create a case when the scan completes.
-
In All Targets (domain names of your web sites to distinguish multiple websites on the same IP address) and IP addresses to scan, enter all targets. PCI DSS requires customers to supply FQDNs in addition to external-facing IP addresses and other unique entryways into applications for the entire in-scope infrastructure. This includes, but is not limited to:
- Discrete IP addresses
- IP address ranges
- Domains for all web servers
- Domains for mail servers
- Domains used in name-based virtual hosting
- Web-server URLs to directories that cannot be reached by crawling the website from the home page
- Any other public-facing domains or domain aliases
To include multiple domains, enter each domain on a separate line. Do not use commas, semicolons, or other separators.
The box also uses what you enter to seed the scanner. Seed entries include hidden URLs that cannot be reached from the homepage. These seed URLs allow the scanner to reach more of your application, ensuring the most thorough possible scan.
- In Addresses to exclude, enter the TCP/IP addresses of the hosts you want to exclude from the scan operation, if applicable.
- In Your top level domains for scoping suggestions, enter top-level domains to help the PCI scanner find more scan targets that you want to include in the scan.
- Under Scan Schedule, specify how often to run the scan, the start time, and your time zone.
- Under Notification Settings, type the email address where you want to receive notifications when the scan is finished.
- Click Save.
Address PCI compliance vulnerabilities
After viewing the results of a PCI compliance scan, if the status displays "Non-compliant," you must address vulnerabilities.
A scan retains its non-compliant status until you generate a final report.
To address PCI compliance vulnerabilities:
- On the Scans page, click the PCI Compliance tab.
- Under Latest 25 Reports, click the name of the non-compliant results that contain the vulnerabilities to address.
- In the PCI Scan Result report, click the name of the vulnerability to address to view information about the vulnerability, including the CVE number, a brief description of the vulnerability, and possible solutions.
- Review the information for the vulnerability and address as necessary. If you cannot address the vulnerability due to a business or technical constraint, you can dispute the vulnerability. For more information, see Dispute failing vulnerabilities.
- After you address each vulnerability identified in the PCI Scan Result report, run the scan again to verify you addressed the vulnerability. See Re-scan a non-compliant PCI scan.
Disable weak and anonymous ciphers
PCI-DSS requires web sites to use strong cryptography and security protocols such as Secure Socket Layer/Transport Layer Security (SSL/TLS) or Internet Protocol Security (IPsec) to safeguard sensitive cardholder data during transmission over open public networks. In addition, you must disable insecure protocols like SSL 2.0 and weak ciphers, or you will fail a PCI compliance scan.
Most versions of Apache have SSL 2.0 enabled by default. To disable SSL 2.0 and weak ciphers:
- Open the httpd.conf or ssl.conf file, then search for the SSLCipherSuite directive. If you do not have the directive, add it.
- Replace the contents with the following:
SSLProtocol -ALL +SSLv3 +TLSv1
SSLCipherSuite ALL:!ADH:RC4+RSA:+HIGH:+MEDIUM:!LOW:!SSLv2:!EXPORT - Save the file.
- Restart Apache.
More resources:
mod_ssl documentation for disabling SSL 2.0 and weak ciphers
The following registry settings can help secure ciphers and encryption settings for Microsoft Internet Information Server (IIS).
Alert Logic makes no warranty as to the efficacy of the script. Many services on a Windows computer may use SSL/TLS such as Remote Desktop, LDAP, HTTPs, SMTPs, or Windows remote management ports. Changing the encryption settings may affect other services. This script may need to be customized for your environment. Use this script at your own risk, and try it on a development environment first. Before you edit the registry, export the keys in the registry that you plan to edit, or back up the whole registry.
Restart the server after implementing the registry changes.
[HKEY_LOCAL_MACHINE\SYSTEM\CurrentControlSet\Control\SecurityProviders]
“SecurityProviders”=”msapsspc.dll, schannel.dll, digest.dll, msnsspc.dll”
[HKEY_LOCAL_MACHINE\SYSTEM\CurrentControlSet\Control\SecurityProviders\SaslProfiles]
“GSSAPI”=”Kerberos”
[HKEY_LOCAL_MACHINE\SYSTEM\CurrentControlSet\Control\SecurityProviders\SCHANNEL]
“EventLogging”=dword:00000001
[HKEY_LOCAL_MACHINE\SYSTEM\CurrentControlSet\Control\SecurityProviders\SCHANNEL]
“AllowInsecureRenegoServers”=dword:00000000
[HKEY_LOCAL_MACHINE\SYSTEM\CurrentControlSet\Control\SecurityProviders\SCHANNEL\Ciphers\DES 56/56]
“Enabled”=dword:00000000
[HKEY_LOCAL_MACHINE\SYSTEM\CurrentControlSet\Control\SecurityProviders\SCHANNEL\Ciphers\NULL]
“Enabled”=dword:00000000
[HKEY_LOCAL_MACHINE\SYSTEM\CurrentControlSet\Control\SecurityProviders\SCHANNEL\Ciphers\RC2 128/128]
“Enabled”=dword:00000000
[HKEY_LOCAL_MACHINE\SYSTEM\CurrentControlSet\Control\SecurityProviders\SCHANNEL\Ciphers\RC2 40/128]
“Enabled”=dword:00000000
[HKEY_LOCAL_MACHINE\SYSTEM\CurrentControlSet\Control\SecurityProviders\SCHANNEL\Ciphers\RC2 56/128]
“Enabled”=dword:00000000
[HKEY_LOCAL_MACHINE\SYSTEM\CurrentControlSet\Control\SecurityProviders\SCHANNEL\Ciphers\RC4 128/128]
“Enabled”=dword:00000000
[HKEY_LOCAL_MACHINE\SYSTEM\CurrentControlSet\Control\SecurityProviders\SCHANNEL\Ciphers\RC4 40/128]
“Enabled”=dword:00000000
[HKEY_LOCAL_MACHINE\SYSTEM\CurrentControlSet\Control\SecurityProviders\SCHANNEL\Ciphers\RC4 56/128]
“Enabled”=dword:00000000
[HKEY_LOCAL_MACHINE\SYSTEM\CurrentControlSet\Control\SecurityProviders\SCHANNEL\Ciphers\RC4 64/128]
“Enabled”=dword:00000000
[HKEY_LOCAL_MACHINE\SYSTEM\CurrentControlSet\Control\SecurityProviders\SCHANNEL\Ciphers\Triple DES 168/168]
“Enabled”=dword:ffffffff
[HKEY_LOCAL_MACHINE\SYSTEM\CurrentControlSet\Control\SecurityProviders\SCHANNEL\Hashes\MD5]
“Enabled”=dword:00000000
[HKEY_LOCAL_MACHINE\SYSTEM\CurrentControlSet\Control\SecurityProviders\SCHANNEL\Hashes\SHA]
“Enabled”=dword:ffffffff
[HKEY_LOCAL_MACHINE\SYSTEM\CurrentControlSet\Control\SecurityProviders\SCHANNEL\KeyExchangeAlgorithms\PKCS]
“Enabled”=dword:ffffffff
[HKEY_LOCAL_MACHINE\SYSTEM\CurrentControlSet\Control\SecurityProviders\SCHANNEL\Protocols\PCT 1.0\Client]
“Enabled”=dword:00000000
[HKEY_LOCAL_MACHINE\SYSTEM\CurrentControlSet\Control\SecurityProviders\SCHANNEL\Protocols\PCT 1.0\Server]
“Enabled”=dword:00000000
[HKEY_LOCAL_MACHINE\SYSTEM\CurrentControlSet\Control\SecurityProviders\SCHANNEL\Protocols\SSL 2.0\Client]
“Enabled”=dword:00000000
[HKEY_LOCAL_MACHINE\SYSTEM\CurrentControlSet\Control\SecurityProviders\SCHANNEL\Protocols\SSL 2.0\Server]
“Enabled”=dword:00000000
[HKEY_LOCAL_MACHINE\SYSTEM\CurrentControlSet\Control\SecurityProviders\SCHANNEL\Protocols\SSL 3.0\Client]
“Enabled”=dword:00000000
[HKEY_LOCAL_MACHINE\SYSTEM\CurrentControlSet\Control\SecurityProviders\SCHANNEL\Protocols\SSL 3.0\Server]
“Enabled”=dword:00000000
[HKEY_LOCAL_MACHINE\SYSTEM\CurrentControlSet\Control\SecurityProviders\SCHANNEL\Protocols\TLS 1.0\Client]
“Enabled”=dword:00000001
[HKEY_LOCAL_MACHINE\SYSTEM\CurrentControlSet\Control\SecurityProviders\SCHANNEL\Protocols\TLS 1.0\Server]
“Enabled”=dword:00000001
[HKEY_LOCAL_MACHINE\SYSTEM\CurrentControlSet\Control\SecurityProviders\SCHANNEL\Protocols\TLS 1.2\Client]
“Enabled”=dword:00000001
[HKEY_LOCAL_MACHINE\SYSTEM\CurrentControlSet\Control\SecurityProviders\SCHANNEL\Protocols\TLS 1.2\Server]
“Enabled”=dword:00000001
[HKEY_LOCAL_MACHINE\SYSTEM\CurrentControlSet\Control\SecurityProviders\WDigest]
“Negotiate”=dword:00000000
[HKEY_LOCAL_MACHINE\SYSTEM\CurrentControlSet\Control\SecurityProviders\WDigest]
“UTF8HTTP”=dword:00000001
[HKEY_LOCAL_MACHINE\SYSTEM\CurrentControlSet\Control\SecurityProviders\WDigest]
“UTF8SASL”=dword:00000001
Re-scan a non-compliant PCI scan
You can run a PCI scan between scheduled scan times. If a scheduled PCI scan result is "Non-compliant," and you have addressed the vulnerabilities discovered by the scan, you can use the re-scan feature to determine compliance.
To re-scan a scheduled PCI scan policy:
- On the Scans page, click the PCI Compliance tab.
- Click the PCI Scan Result with a status of "Non-compliant."
- Click Re-scan.
Dispute failing vulnerabilities
A PCI scan may report findings that you want to dispute. For example, the scan may identify a vulnerability in your environment that may be a false positive. Or, the scan may identify a vulnerability that you cannot address due to a business or technological constraint but that you could resolve through the use of a compensating control. In these and similar situations, you can dispute the vulnerability through an official dispute process. Alert Logic provides the Alert Logic PCI Dispute system for handling disputes, which you can access directly from your PCI Scan Results report in the Alert Logic console.
When disputing a vulnerability identified in results from an Alert Logic PCI Scan, use the Alert Logic PCI Dispute system; do not submit the dispute to the PCI SSC.
The Alert Logic PCI Dispute system is sometimes referred to as "PCI Referee".
Topics:
- Dispute Types
- How to submit a dispute
- How to review or update a submitted dispute
- Work with the Alert Logic PCI Scan Disputes page
- Dispute statement guidelines and examples
Dispute Types
You can dispute findings in the PCI scan results in the following cases:
- Vulnerability found is incorrect (false positive)
- Vulnerability has a disputed CVSS Base score
- Vulnerability has a compensating control in place
- Exceptions exist in the report
For more information, see PCI Security Standards Council:
- For PCI scan vulnerability disputes, see the ASV Program Guide
- For compensating controls, see the Payment Card Industry (PCI) Data Security Standard. Only companies that have undertaken a risk analysis and have legitimate technological or documented business constraints can consider the use of compensating controls to achieve compliance.
How to submit a dispute
To dispute a vulnerability, you provide an explanation and supporting evidence for the disputed findings, and submit the information for review by an Alert Logic ASV Security Engineer. After you submit your dispute request, the engineer, with whom you can communicate through the PCI Dispute system, reviews the submitted evidence and makes a ruling. The following procedure explains how to submit your dispute using the Alert Logic PCI Dispute system.
To dispute a vulnerability:
- On the Scans page, click the PCI Compliance tab.
- Under Latest 25 Reports, click the link for the PCI scan results containing a vulnerability to dispute.
- Under PCI Scan Result, locate the Date and Report ID values. You must provide this information when you contact Alert Logic.
- Click Dispute Results.
The PCI Scan Disputes page appears, displaying the list of identified vulnerabilities. - For each vulnerability, do the following steps:
- Click the box next to the vulnerability.
- Select a dispute type from the drop-down list. The following options are available:
- Dispute Score
- Compensating Control
- False Positive
- Scan Exception
- In the Notes box, type your dispute statement. Review Dispute statement guidelines and examples for guidance when developing your dispute statement.
- (Optional) Click attach file to upload supporting documentation.
The PCI Scan Disputes page provides features that can help when disputing multiple vulnerabilities or vulnerabilities that have been disputed before. For more information, see Work with the Alert Logic PCI Scan Disputes page.
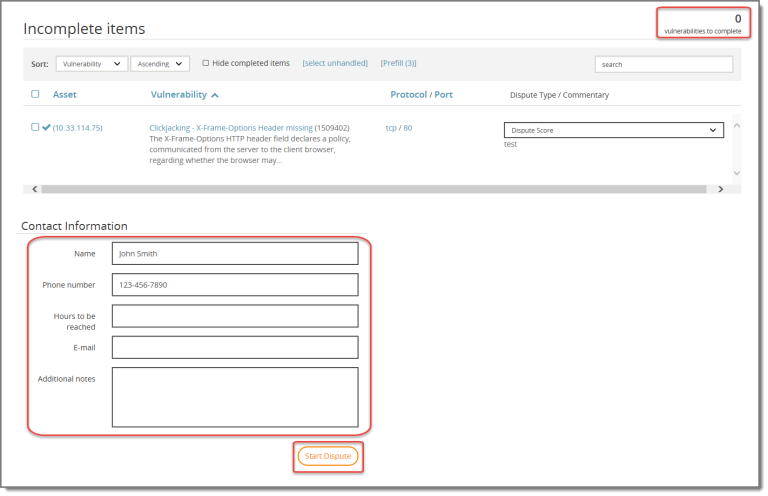
After you have addressed each vulnerability, the Contact Information box appears at the bottom of the page.
- Under Contact Information, enter your information, or the information for the person responsible for PCI accountability.
- Review your dispute content. Make sure each dispute statement is correct and complete. Once you submit a dispute, the statement cannot be modified; you can only add evidence that addresses the statement.
- Click Start Dispute to notify Technical Support of your dispute request. Both you and the designated dispute contact at your company receive confirmation of the dispute request by email.
If you need assistance, call Technical Support (US: (877) 484-8383, EU: +44 (0) 203 011 5533).
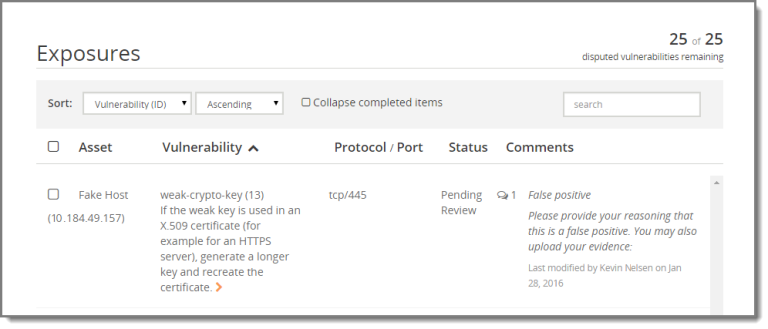
How to review or update a submitted dispute
After you submit your dispute, an Alert Logic ASV Security Engineer reviews your request. After the engineer makes a ruling, you will receive an email notification. At that time, you can review the dispute and add further comments.
Once you submit a dispute, the statement cannot be modified; you can only add evidence that addresses the statement.
To review or update a submitted dispute:
- On the Scans page, click the PCI Compliance tab.
- Under Latest 25 Reports, click the link for the PCI scan results for which the dispute was requested.
- On the PCI Scan Results page, under Report Downloads, locate the dispute request status banner, and click the provided link.
- The PCI Scan Disputes page appears, where you can review comments, provide updates, and communicate with an Alert Logic ASV Security Engineer.
Work with the Alert Logic PCI Scan Disputes page
The PCI Dispute system is a process for disputing findings in PCI scan results. The Alert Logic PCI Scan Disputes page is the interface for submitting the dispute requests. This topic provides an overview of working with the PCI Scan Disputes page.
- PCI Scan Disputes page overview
- Sort and search content
- Enter dispute type and supporting documentation
- Address multiple exposures in bulk
- Prefill information from previous disputes
- Enter contact information and start dispute
- Communicate with Alert Logic ASV Security Engineer
PCI Scan Disputes page overview
The Alert Logic PCI Scan Disputes page lists all of the failing vulnerabilities identified in your PCI Scan. The following list highlights some of the features of the page:
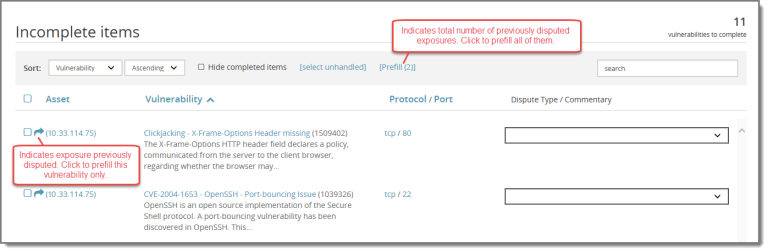
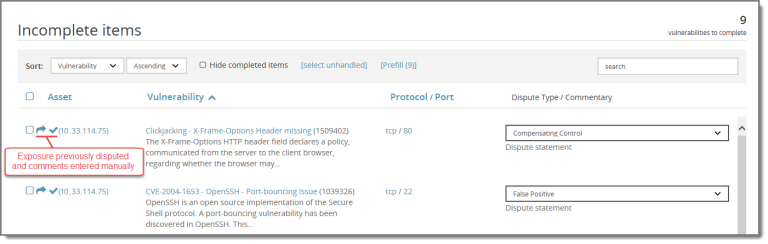
- A detailed description is provided for each vulnerability. To display the entire description, hover over the description.
- Any exposures that have been disputed in a previous scan are identified with an arrow (
 ). For these items, you can prefill information from the previous disputes.
 - Multiple exposures of the same vulnerability type can be located by clicking the vulnerability link. You can also locate all exposures on a particular asset, on a particular port, or related to a protocol by clicking the respective link. You can then address the similar vulnerabilities in bulk.
- Vulnerabilities that have had supporting documentation entered are ready to be submitted and have a check mark (
 ) next to them.
 - The number of vulnerabilities yet to be addressed is reflected in the upper right corner. All vulnerabilities must be addressed before you can submit your dispute request.
Sort and search content
You can sort the list of vulnerabilities by various parameters, and you can search all content using the search box.
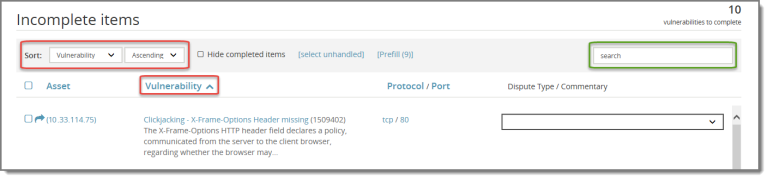
To sort the list of vulnerabilities, use the Sort fields or click a column name. You can sort by the following values:
- Host IP Address / Asset
- Vulnerability
- Service Protocol
- Service Port
- Risk Level (CVSS score). Note: The risk level is not visible on the PCI Scan Disputes page. To see the risk level, hover over the vulnerability to display the entire description, which contains the risk level. You can also generate the PCI Scan Vulnerability Details report.
- Dispute Type
To search the content, type a value in the search box.
Enter dispute type and supporting documentation
For each vulnerability, you must specify a dispute type and supporting documentation. Use the following procedure to enter this information for one vulnerability at a time.
To enter dispute type and supporting documentation:
- Click the box next to the vulnerability.
- Select a dispute type from the drop-down list. The following options are available:
- Dispute Score
- Compensating Control
- False Positive
- Scan Exception
- In the Notes box, type your dispute statement. Review Dispute statement guidelines and examples for guidance when developing your dispute statement.
- (Optional) Click attach file to upload supporting documentation.
After you have entered your supporting documentation, a check mark () appears next to the vulnerability, indicating that it is ready to be disputed. To hide the entry fields, click on the box for the next vulnerability. The number of vulnerabilities to complete is adjusted.

Address multiple exposures in bulk
For vulnerabilities that share the same dispute types and supporting documentation, you can address multiple exposures in bulk.
To address exposures in bulk, first select the vulnerabilities to address. You can select multiple vulnerabilities as follows:
- Select all listed vulnerabilities
- Select all unhandled vulnerabilities
- Select individual vulnerabilities. To organize related vulnerabilities together, you can sort the list by clicking one of the column names: Asset, Vulnerability, Protocol, Port
- Click on a vulnerability link to select all vulnerabilities of that same type. You can also select all exposures on a particular asset, on a particular port, or related to a protocol by clicking the respective link.
When you make your selection of multiple vulnerabilities, the Bulk Operations box appears, displaying the number of exposures selected. To hide the Bulk Operations box, click the arrow.
To apply bulk operations:
- Select a dispute type from the drop-down list.
- In the Comment box, type your dispute statement. Review Dispute statement guidelines and examples for guidance when developing your dispute statement.
- (Optional) To upload supporting files:
- Click select file and locate the files to upload.
- In the Comment box, type any supporting comments.
- Click attach.
- Click Apply to enter this information for each selected vulnerability.
Prefill information from previous disputes
If you have already disputed some of your vulnerabilities, you can re-use the comments submitted in your previous dispute. An arrow () appears next to each of the previously disputed vulnerabilities. You can prefill these vulnerabilities individually, or you can prefill all of them at the same time using the Prefill button. The Prefill button displays the number of previously disputed vulnerabilities.
To prefill information for a single previously disputed vulnerability, click the arrow () next to the vulnerability. To prefill information for all previously disputed vulnerabilities, click Prefill.
The following example shows the results of having used the Prefill button. Comments are copied from your previous disputes for both vulnerabilities, the arrows () change to ready indicators (), and the number of vulnerabilities to complete is adjusted.
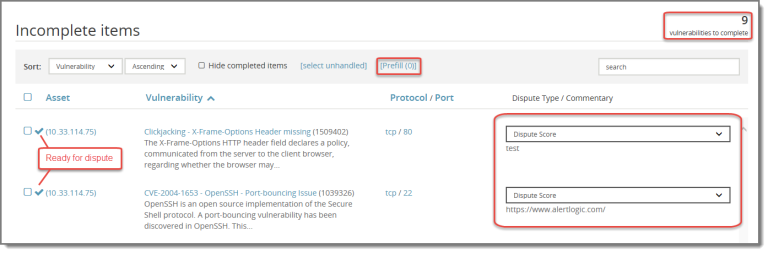
If you manually enter comments for a previously disputed vulnerability rather than using Prefill, the action is reflected with both the arrow and check mark ( ).
).
Enter contact information and start dispute
After you have entered comments for all exposures, the Contact Information box appears at the bottom of the page. Enter required Name and Phone number, and any other additional information, and click Start Dispute to submit your dispute request.
Communicate with Alert Logic ASV Security Engineer
After your dispute has been submitted, an Alert Logic ASV Security Engineer reviews your request. If additional information is required, you can communicate within the PCI Dispute system.
Dispute statement guidelines and examples
When you dispute a vulnerability finding, you provide the type of dispute and an explanation for your dispute. Also, if an issue appears with a PCI assessment, the only way to pass the check is to provide an acceptable dispute; PCI does not recognize a justification of the presence of the issue alone as a valid dispute.
Use the following general guidelines when developing your dispute statement:
- Provide detailed, specific information about the reasons you believe the scan result is a false positive.
- Provide proof that you have resolved the scan vulnerability.
- Provide specific information about the operating system, service, or patch level if the issue under dispute is version-specific.
- Do not address a configuration issue by simply claiming to be patched against the issue.
- Do not claim the software in use is the latest version and not include evidence that the version in use does not include the same risk.
- Do not claim a detected plug-in or product version is incorrect and not provide evidence of the difference.
- Make sure the dispute statement is correct and complete before you submit it. Once you file a dispute, the statement cannot be modified; you can only add evidence that addresses the statement.
Examples
The following list provides specific examples that may help you when developing your dispute statement:
- If the issue under dispute is version specific, provide specific information about the operating system, service or patch level :
Incorrect: This does not affect our version of Windows.
Correct: The discovered vulnerability (MS06-057) does not apply to the version of the operating system that we run (MS Windows 2008 R2).
- If the assessment reveals a version of .NET 2.0.xxxx, and you do not use this version of .NET, you must include evidence that .NET 2.0 is not in use.
- If the scan detects a version of a service considered vulnerable, and you use a different version of the service, you must include the version of the service in use.
- If you operate multiple versions of a given daemon on some systems, and a version of a web server is shown as a vulnerable version, you must provide a statement that the version reported by the server itself to the scanner is wrong. Also, you must provide documentation that the service bound to the port is the correct version.
Complete final PCI compliance documentation
After you address all your PCI vulnerabilities, you need to prepare required PCI compliance documentation and submit it to your acquirer. Required PCI compliance documentation includes:
- Final PCI scan reports
- Self-Assessment Questionnaire (SAQ) and Attestation of Compliance
An acquirer is typically the entity, such as a credit card processor, that provides credit card processing services.
To complete final PCI compliance documentation:
- Prepare final PCI scan reports.
- Prepare Self-Assessment Questionnaire and Attestation of Compliance.
- Submit final PCI scan reports, SAQ, and Attestation of Compliance to your acquirer.
Prepare final PCI scan reports
When your PCI scan results are compliant, you can generate your final reports for submission to an acquirer.
To prepare final PCI scan reports:
- On the Scans page, click the PCI Compliance tab.
- Under Latest 25 Reports, click the name of the scan results to submit to your acquirer. The scan results must have a status of compliant.
- Under Report Downloads, click each of the following reports to generate and download:
- Executive Summary
- Vulnerability Details
- Attestation of scan compliance
The Vulnerability Details report is available as a .csv file in addition to the PDF download. The .csv file includes less detail than the PDF, but the information is easy to view and analyze in a spreadsheet.
If you want to send feedback to the PCI SSC regarding your scanning experience, your experience with Alert Logic, or any other aspects of PCI scans, click the PCI ASV Feedback Form link below the list of reports.
Prepare Self-Assessment Questionnaire and Attestation of Compliance
To validate compliance with PCI DSS, you must submit a Self-Assessment Questionnaire and Attestation of Compliance with your final PCI scan reports. You can obtain the required documents from the PCI SSC, as described in the following procedure.
To prepare the Self-Assessment Questionnaire and Attestation of Compliance:
- Use the guidelines provided in the table on the PCI SSC website to determine the appropriate questionnaire for your company. Note the letter code for the questionnaire.
- Referencing the letter code, locate and download the appropriate questionnaire from the PCI SSC document library. You can choose DOC or PDF format.
- Complete the questionnaire.
Technical Description
Host discovery
Host discovery determines if a computer or IP address is active. It is a balance between detecting legitimate hosts and flooding empty address ranges with unneeded traffic.
Per the PCI ASV Program Guide, the PCI requirement for performing host discovery is:
The ASV scan solution must make a reasonable attempt to identify live systems, including live systems that do not respond to ICMP echo (“ping”) requests.
Alert Logic defines "reasonable attempt" as the following connection attempts to the target:
- ICMP echo (ping)—first attempt
A ping sweep using ICMP messages is sent to each address. - ICMP echo (ping)—second attempt
If an answer is not received on the first attempt, another ICMP ping is made. - ICMP timestamp
ICMP timestamp requests are made. - Test top 18 TCP ports
(21, 22, 23, 25, 53, 80, 111, 135, 139, 259, 443, 445, 465, 900, 993, 995, 3389, 8081)
Alert Logic sends a TCP ping to commonly used ports. TCP pings use a deviation of the TCP standard three-way handshake to determine if a computer responds. This method sends an unsolicited TCP Acknowledge (TCP ACK) to the specified port. If an active computer is listening on this port, it should send back a reset to the unsolicited request.
Another method involves sending a TCP Synchronize (TCP SYN) message (similar to the TCP ACK) to the commonly used ports and looking for a response. - Test top 12 UDP ports
(53, 69, 111, 123, 137, 138, 161, 177, 445, 500, 1900, 4500)
The most common UDP ports are tested for response. - "Port Closed" responses
An active host sends a response to indicate a port is closed.
In some isolated cases, these methods may not detect all hosts. Alert Logic recommends that you enable ICMP echo (ping) or ICMP timestamp as a beacon to the Alert Logic scanner.
Port scan
The port scanning segment of the scanning process is split into two parts: the TCP port scan and the UDP port scan. Alert Logic uses full connect scans on both types of ports.
TCP port scan
- The scanner makes a connection to the target server through each port in the scan policy.
- The scanner executes a full RFC compliant TCP/IP handshake
- Each port gives one of three responses:
- Port open: These ports get examined further in the next step of the scanning process.
- Port closed: These ports are ignored for the remainder of the scan.
- No answer or dropped package: These ports are filtered out because the Alert Logic request can not get through. The time out period on these ports is ten seconds.
UDP port scan
- The scanner attempts to make a connection to the target server through each port in the scan policy.
- The scanner waits the maximum amount of time for each port.
-
The scanner labels each port as open or filtered.
UDP ports do not always send responses even if they are open, so the scanner sometimes labels open ports as filtered.
UDP ports take much longer to scan than TCP ports. If you want to scan more than the list of common ports, you must enter a custom port list.
Service detection
After the port scan finds open ports, the service detection segment of the scan identifies which services are running on the port. The scanner searches all open ports for all known services, in case services are running on non-standard ports.
- The scanner sends traffic to ports using various protocols and records those that get responses.
- TCP ports: The scanner sends specific queries to the port until it receives a recognizable response.
- UDP ports: Because UDP ports without connection errors are inferred to be open, UDP service detection is both slow and unreliable. Many systems filter out ICMP error messages, or only send a certain number of error messages per second.
- The scanner analyzes each response received and determines which type of service sent the response.
Version detection
The version detection segment of the scan attempts to identify the following items for the port:
- Version numbers for each service on the port
- Applications running on the service
- Third-party plug-ins
- Security patches
This phase of the scan is done in two steps:
- The scanner runs the Nmap service and version detection.
- The scanner runs proprietary Alert Logic service and version detection.
Results from the two steps are then combined together into a comprehensive list of software, versions, and patches.
Vulnerability evaluation
In the vulnerability evaluation phase, Alert Logic compares the software/version/patch list to its vulnerability database. The database includes over 70,000 vulnerable versions and their associated vulnerabilities. The scanner matches the software list with the vulnerability database and provides clients with a list of vulnerabilities that may be present in their environments.
Assessment scope
Following is a sample list of services, devices, and operating systems that Alert Logic tests:
Operating systems
- Linux
- Microsoft® Windows®
Web servers
- Apache
- Microsoft® IIS
Web application servers
- Apache Jakarta Tomcat
- JBOSS
Common web script
- Commonly found scripts (typically, common gateway interface [CGI] scripts) written in various languages
- Ecommerce related scripts, such as shopping carts and CRM scripts
- ASP
- PHP
Database servers
- Microsoft SQL Server™
- MySQL®
- Oracle®
- PostreSQL
Mail servers
- Microsoft® Exchange
- SendMail™
Firewalls
- Cisco PIX®
- NetScreen
Routers
- Cisco
Common services
- Domain name system (DNS)
- file transfer protocol (FTP)
- simple mail transfer protocol (SMTP)
Router check
The scanning solution tests the router for known vulnerabilities and configuration issues in the firmware.
Firewall check
- Check for up-to-date patches on known vulnerabilities
- Check for open ports indicating inadequate configuration
Operating system check
Vendors release patches to address new exploits and flaws. The scanning solution verifies that the operating system has the latest patches installed.
Database check
New exploits are found regularly for database products. The scanning solution detects exploits and open access to databases.
Web server check
The scanning solution tests for all known vulnerabilities, exploits, and configuration issues on web servers. New exploits are routinely discovered in web server products. The scanning solution detects and reports known exploits. The scanning solution checks for other best practices, for example, making sure that directory browsing is not possible on the server.
Complex passwords
Alert Logic supports complex passwords; however, some special characters give command line interfaces difficulty, as they have special meanings. Keep your password special characters limited to numbers (0-9), periods (.), colons (:), semi-colons (;), quotes (',',","), percentages (%), and spaces ( ).
Scanning depth
Alert Logic scanning enables safe and accurate assessments without affecting network operations. If the system finds an open SNMP service, it will poll it for as much information as possible (true operating system, real hostname, patch level), but it will not attempt to exploit holes to demonstrate what an attacker can do.
Backporting
Backporting involves taking a software patch and applying it to an older version of the software than the version it was designed to modify. Backporting is specific to some UNIX/Linux and open source vendors. See also Red Hat about backporting security fixes.
If you are using zero privileged level of network scanning, then Alert Logic scanning provides the option to ignore a vulnerability, which documents the presence of your vendor-supplied patch and suppresses further reporting of this issue on those IP addresses. You can export the list of ignored vulnerabilities as a report to give to other auditors showing the documented fixes for supposed network vulnerabilities. Network scanners report based on the found version, and auditors expect all vulnerabilities to be enumerated and exceptions to be documented.
The best way to handle backported patches is to do credentialed scans. The preferred method for handling this is using the OVAL algorithm and data feeds Alert Logic gets directly from RedHat and other Linux vendors. When you run scans with credentials, the system automatically enumerates the list of installed patches and auto-suppresses vulnerabilities that have been addressed by backported patches. Alert Logic scanning can do this internally and externally from the internet, but it requires standard user access to a Secure Shell (SSH) service on that computer.
When a network vulnerability scanner assesses a computer, it bases some of its findings on found versions of software. If these versions are known to be vulnerable to certain issues, they are enumerated as vulnerable to their respective CVEs. If your vendor backports security fixes and does not update the software version number, you may not be vulnerable despite what the Alert Logic vulnerability report states.
Scanning system details
SSL certificate host name discrepancy
This vulnerability appears in a report when the name listed in the SSL certificate configuration does not match the name used to access the host. This is an automatic failure for external PCI assessment scans due to the inability to verify the legitimacy of the host.
This vulnerability commonly appears when an administrator reuses an SSL certificate from one web application for another. For example, an SSL certificate created for www.mydomain.com can not be used for mypage.mydomain.com.
Mitigation
Use the mitigation methods listed below to address this vulnerability.
- External sites
- Purchase a new SSL certificate created specifically for your web application.
- Use a wildcard SSL certificate for any page on the domain.
- Internal methods
- Update the reverse DNS record of the IP address to be the same as the subject of the SSL certificate. The scan will automatically detect the reverse DNS name and if it matches the subject of the SSL certificate, the issue will not be flagged.
- Update the SSL Certificate subject line to match the host name of the device.
- Other methods
- If the scanner was unable to resolve a host name for the host, it is typically related to the configured DNS servers not having a record of the host.
- If the certificate is not valid because it is a generic or default self-signed certificate, you can choose to filter the vulnerability at the IP or job level. If the host name (or lack thereof) provided by the certificate does not match the host name discovered during scanning, this is a valid finding. Filtering this vulnerability is at the discretion of the client only.
False positives
False positive in external or internal scan
If the scan result is a false positive, you can make the exposure inactive to remove the results from reports.
False positive in PCI scan
In many cases, the SSL certificate host name discrepancy appears because the host was scanned via IP address instead of via fully qualified domain names (FQDN). PCI-DSS requires customers to supply FQDNs in addition to providing all external-facing IP addresses and all other unique entryways into applications for the entire in-scope infrastructure. This information must be included when you schedule a scan.
If you deploy load balancers, the scan may only see part of the configuration behind the load balancer. In these cases, the following applies:
- Localized load balancers: You must supply documentation showing that the infrastructure behind the load balancer(s) is synchronized in terms of configuration.
- External load balancing services: Implement a configuration to ensure that all IP addresses and ranges provided are successfully scanned.
If you believe that a PCI assessment failure was in error, first verify that the FQDN resolves to the host using an outside source such as www.sslshopper.com or www.digicert.com/help. These sources may also identify other certificate problems.
PCI scan disputes
If the FQDN resolves to the host, you may submit a dispute. Provide the FQDN in the dispute comment so that Alert Logic can validate the certificate. Enter only one FQDN per host. A single dispute comment containing a blanket statement for all hosts found in the scan is not acceptable. In the case of a load balancer, provide all expected IP resolutions of the FQDN and confirm that hosts behind the load balancer are in sync.
In general, using the FQDN in the scan configuration prevents this vulnerability from appearing.
Brute force user name and password guessing
Alert Logic scanning performs some user name and password guessing; however, it does not perform an all-out brute force attempt against accounts. Many devices come with default administrative account names, and the system checks for standard user name/password combinations, such as:
- 3Com hubs/switches default logon—manager:manager
- Windows Network—administrator:administrator or administrator:blank
- MS-SQL—sa:blank
Alert Logic scanning does not perform straight brute force attempts against logins, as there is too great a risk of causing a denial-of-service situation by locking out accounts.
Denial-of-service attacks and buffer overflows
Alert Logic does not run any test that can cause significant or fatal damage to a system or application. Alert Logic can test some buffer overflow and denial-of-service (DoS) vulnerabilities without harming your server or service. Strict quality assurance measures ensure tests are safe before release. It is impossible to test for all configuration possibilities and it is difficult to completely rule out any disruptions.
For vulnerabilities that require a non-active testing method, the Alert Logic scanning system deploys a passive scan operation utilizing versioning, configuration testing, and inference to determine the likelihood of the existence of a given vulnerability. Vulnerabilities that cannot be completely verified are stated as warnings, with associated detail to evaluate mitigation strategies for that issue.
Denial-of-service situations
Alert Logic has identified two scenarios in which active testing could cause a DoS situation on a network.
- Consumption of firewall connections/exhaustion of firewall resources
If an internal Threat Manager appliance is placed behind a firewall and instructed to scan computers on the other side of the firewall, the appliance could exhaust the available outbound connections/resources of the firewall. This has happened on Cisco PIX firewalls where port address translation (PAT) was used to PAT private, internal addresses to the outside interface. During the port scanning phase of the scan, a large number of connections are initiated to identify all open ports on a target device.
To avoid this scenario:- Place the appliance on a segment of the network where it does not have to go through the firewall to reach the target.
- Provide a static IP translation for the IP address of the testing unit. This reduces the number of connections the firewall must "remember" during testing.
- Debug level logging/religious logging
An appliance performing a high level of logging can cause a DoS situation. This has happened in both internal and external testing. This scenario is a classic security vulnerability. If a firewall logs every connection attempt to a remote system, it could generate gigabytes of log file traffic, which causes a strain on network infrastructure and exhausts file system resources of the remote logging console. This is a known problem with debug-level logging (i.e., logging everything). When a port scan is performed, the number of connections to a device can range from 1,500/3,000 ports connection attempts up to 65,535/131,070 ports connection attempts. To prevent a DoS situation, use a lower level of logging.
Scans and network performance
The Alert Logic scan engine includes the following features designed to protect network performance:
- Active scan tools designed and tested to be sensitive to network operations
- Passive asset profiling that does not require an active test
- Scan job configuration options
- Schedule configuration options
- Bandwidth limits on scan jobs
- Custom parameters for more light or heavy port scanning
- Option to exclude IP addresses for devices that may not respond well to scanning
- Flexible scheduling to ensure scan activity occurs only during approved times
Load-balancing devices
If your environment has a web farm behind a load-balancing device, there is no way to asses all devices, because the load-balancing device creates the algorithm that determines load distribution. The Alert Logic software would find issues in your code base, but computer-specific issues might be missed due to the decisions made by the load-balancing device.
To ensure that Alert Logic scans each device, place a Threat Manager appliance where it reaches the individual computers in the web farm.
Operating systems
Alert Logic scanning generally tests for any operating system that supports a TCP/IP stack; however, results vary among operating systems. DOS and Windows 3.1 WFWG support TCP/IP, but few known vulnerabilities exist for these systems.
Alert Logic does not rely on operating system guessing as a part of vulnerability assessments. For instance, a network that uses an F5 BIG-IP load balancer on its perimeter would skew the results of a test that relied on operating system guessing. While the web site being hosted could reside on a Microsoft IIS server, the BIG-IP itself fingerprints as a BSD UNIX operating system. In this case, a more comprehensive test prevents inaccurate and possibly dangerous results.
Operating system and host name reporting
Operating system guessing and host name determination in Alert Logic scanning is based off of a weighted system. The report shows the item with the highest weight (confidence factor).
Examples of the host name weighted system are as follows:
| Method | Weight |
|---|---|
| DNS forward lookup | 1 |
| FTP/SMTP/Telnet/IMAP/POP3 Banners | 4 |
| SSL Certificate Subject Names | 5 |
| MS RPC | 5 |
| SNMP | 6 |
| MSSQL | 8 |
| NetBIOS – nbtstat | 12 |
| Authenticated SSH | 13 |
| Authenticated NetBIOS | 15 |
Examples of the host weighted system are as follows:
| Operating system guessing method | Weight |
|---|---|
| IP Fingerprinting (nmap) | 2 |
| HTTP Server Headers | 5 |
| FTP/SMTP/Telnet/IMAP/POP3 Banners | 6 |
| NetBIOS – nbtstat | 8 |
| Authenticated – SNMP | 10 |
| Authenticated – SSH | 11 |
| Authenticated – NetBIOS | 15 |
Authenticated scanning
Alert Logic allows you to use credentials to perform host-level authenticated scanning. Using Windows or SSH credentials as part of your scans allows for more accurate vulnerability scans and lowers the number of false positive results.
This section provides information on:
- Windows authenticated scanning
- UNIX/Linux authenticated scanning
- Amazon Web Services authenticated scanning
- Credential storage
Windows authenticated scanning
Windows authenticated scanning is an authenticated network-based method for interrogating the target machine for missing security-related patches and updates.
To run Windows authenticated scanning, you must set up the following parameters:
- Credentials— Alert Logic scanning needs a local or domain administrator account to accurately assess the patch level of your computers.
- Network access to RPC/WMI, NetBIOS and SMB/CIFS ports— Alert Logic scanning requires access to RPC/WMI (135/tcp, 49152-65535/tcp), NetBIOS (139/tcp, 137/udp, 138/udp) and SMB/CIFS (445/tcp and 445/udp). Network or personal firewalls blocking access to any of these protocols will prevent access to Windows patch scanning.
- Enable Remote Registry servicesThe Remote Registry service must be enabled and started. Verify this from the Administrative Control Panel under Services.
If the authentication fails, the scan report will list Exposure ID: 16205 - Local Checks Error.
To set up a dedicated user for scanning:
Use the following procedure to set up a dedicated user that Alert Logic can use for authenticated scanning.
- Click Start, type lusrmgr.msc, and press Enter.
- Right-click the Users folder, and then click New User.
- On the New User window:
- In User Name, type a new user name (for example, Alert Logic Dedicated Scanning User).
- In Password, type a password.
- In Confirm Password, type the password again.
- Click Create.
- After the window refreshes, indicating successful user creation, click Close.
- Click the Groups folder, then right-click Administrators and click Add to Group.
- On the Administrators Properties window, click Add.
- On the Select Users window, in Enter the object names to select, type the newly created user (for example, Alert Logic), and click Check Names.
- After the window refreshes, reflecting any changes and user confirmation, click OK.
- On the Administrators Properties window, confirm that the user appears under Members, and click OK.
- Close lusrmgr.
To set up WMI:
The Alert Logic scanner needs to connect to Windows Management Instrumentation (WMI) on the machine, in addition to remote registry, to pull version information from .dll and .exe files, as well as information stored within Windows Management services and settings. Unlike Unix and Linux, which come with SSH secure remote access where the system can log on and interrogate things as a user, Alert Logic scanning requires the administrative privileges due to the limitations of methods available to remotely access Windows machines. Alert Logic scanning does not make registry changes and does not write to the machine. To learn more about registry keys, refer to the Microsoft documentation here.
The Open Vulnerability and Assessment Language (OVAL®) method is the preferred method of network-based patch scanning. The scanner uses the OVAL method for assessing Windows-based machines for a variety of Microsoft-specific and third-party application security patches.
WMI comes installed on all Microsoft operating systems. The following procedure describes how to enable remote access to WMI.
To enable remote WMI requests:
- On the target server, go to Administrative Tools, Computer Management.
- Expand Services and Applications.
- Right click on WMI Control, then select Properties.
- Select the Security tab.
- Click Security.
- Add the scan user (if needed), and then be sure to check Remote Enable for the user/group that will be requesting WMI data.
Further Investigation
If the above steps didn’t help, Alert Logic recommends installing the WMI Administrative Tools from Microsoft. This includes a WMI browser that will let you connect to a remote machine and browse through the WMI information. That will help to isolate any issues in a more direct and simple environment. Once the WMI browser can access a remote machine, Alert Logic should have access as well.
UNIX/Linux authenticated scanning
All UNIX and Linux authenticated scanning (security patch scanning) is performed with Secure Shell (SSH) access using a standard user account.
UNIX/Linux operating system types
Alert Logic scanning supports the following operating systems for authenticated scanning:
- Amazon Linux AMI
- CentOS
- Debian
- Fedora
- RedHat
- SuSe
- Ubuntu
If the authentication failed, the scan report will list Exposure ID: 16205 - Local Checks Error.
Authenticated scanning in an Amazon Web Services environment
For authenticated scans to work properly in your environment, you must have your AWS security groups set to allow full access by the scanning appliance. Doing so allows a Cloud Insight appliance to communicate with client instances, so the authenticated scan can detect all possible vulnerabilities and configuration issues. Alert Logic installs appliances alongside the instances inside each Amazon VPC.
By default, security groups are set up to allow full communication among group members. If you modify the default settings, authenticated scans may not reflect a full picture of your instance.
Credential storage
| Type | Encryption type | Notes |
|---|---|---|
| Front end web traffic | TLS 1.2 and AES 256 bit encryption, via HTTPS | User credentials are encrypted using the public key from the FusionVM server, and only the FusionVM server can decrypt the information. |
| FusionVM back end | RSA and Api call EncryptByAsymKey, 2048 bit key length | Encryption of user passwords and authentication credentials for scanned systems is handled by MS-SQL server. |
| Scanning appliances | RSA and DSA, 2048 bit key length |
Encryption by OpenSSH in SSH connections between the Appliance and the FusionVM server. Scanning appliances do not have anything encrypted on the appliances except the password file for appliance login authentication. |
Web application testing
Alert Logic scanning looks for sample/default web pages left from an installation and commonly named files and folders that draw attention from malicious users. Some additional tools check web applications for rudimentary validation errors.
Note that Alert Logic does not perform complete web application tests or source code audits, though many of the http checks overlap with custom application testing.
PCI scanning for web applications
Comprehensive web application scanning is a standard part of Alert Logic PCI scans. Web application scanning enhancements offer hierarchically deep, page-level scanning of common attack vectors including SQL injection and cross-site scripting. The scanning system indexes web servers and builds a list of hierarchical URL links in the website. Web application checks are performed separately for each URL to provide sitewide coverage.
Other web application scanning features
- SQL injection: Check if SQL parameter injection is allowed on the query parameters
- Cross−site scripting: Check if cross−site scripting (XSS) is allowed on the query parameters
- HTTP PUT allowed: Check if the PUT option is enabled at server directories
- Directory index-able: Check if the server directories can be browsed
- Obsolete files exist: Check if obsolete files exist
- CGI scanning: Test for common check web pages
Spider capabilities
A spider crawls websites and gathers as many URL links as possible. These links provide the list of URLs the scanner targets for testing. Spider functions include:
- Crawling HTTP and HTTPS websites based on given URL
- Cookie support
The spider has the following limitations:
- SSL websites with invalid certificate cannot be crawled
- Some ‘malformed’ URLs in HTML pages cannot be recognized
- URLs generated by Javascript cannot be found using this spider
Wireless networks
Wireless environments are transparent to the Alert Logic scanning system. Wireless devices have IP addresses and run applications just like other network systems. In that sense, wireless devices are assessed for security by Alert Logic. However, Alert Logic scanning is based on the Network layer (specifically IP only) and above; lower levels such as Data Link (PPP, SLIP, Ethernet, 802.11b, ATM, Frame-relay) and physical (Fiber, Cat-5, Cat-3, phone line, serial cable) are not within the scope of a network-based assessment.
Vulnerability and exposure library
Vulnerability sources
Alert Logic uses a variety of vulnerability suppliers: public, commercial, third-party, and vendor-driven.
- Security Focus (bugtraq, pentest, incidents, vulndev)
- Cert
- Vulnwatch
- OSVDB
- CVE
- NVD
- I-Cat
- Other vendors
Severity ratings
Alert Logic severity ratings come from the method used by the National Institute of Standards and Technology National Vulnerability Database, and are based on the CVSS Base Score.
Alert Logic assigns each vulnerability one of the following severities based on the CVSS score:
| Severity | CVSS base score |
|---|---|
| Info | 0.0 |
| Low | 0.1 - 3.9 |
| Medium | 4.0 - 6.9 |
| High | 7.0 - 10.0 |
CVE numbers
The Common Vulnerabilities and Exposures (CVE®) enumeration system was developed by the MITRE Corporation. The CVE website provides more information.
Use the CVE number to find vulnerability text that other vendors/researchers have made available or correlate vulnerability assessments with IDS data.
Types of vulnerabilities
Dangerous default settings
Dangerous default settings can come in various forms, including:
- Leaving sample pages/scripts on an IIS installation
- Not changing the manager password from "manager" on a 3Com hub/switch
- Leaving public/private as SNMP community names on a SNMP enabled device
- Failing to set the sa password on a MS-SQL server
Software features and best practices
Attackers can take advantage of usability features for a system or application and use them to access your network. For example:
- ICMP timestamp/netmask requests
- Microsoft netBIOS protocol
- Expand/Verify commands of Sendmail
- Ident services displaying the owner of running processes
Misconfigurations
Alert Logic designed the scanning system to separate true misconfigurations from default out-of-the-box settings. Common misconfigurations that are identified and reported include:
- SMTP relay
- Unrestricted netbios file sharing
- DNS zone transfers
- FTP world writeable directories
- Default administration accounts without passwords
- Open FrontPage websites
- NFS world exportable directories
Vendor flaws
Vendor flaws is the largest category. It includes buffer overflows, string format issues, directory transversals, and cross-site scripting. This category includes any vulnerability that requires a patch or an upgrade to fix.