Managed WAF for Microsoft Azure PaaS Manual Deployment

Create a Microsoft Azure storage account
A storage account represents the highest level in the Microsoft Azure environment. This location is where your containers, disks, and Alert Logic security appliances are stored and deployed.
To create a storage account:
- Log in to the Microsoft Azure management portal.
- At the bottom of the all items library, click New.
- Select Data Services > Storage > Quick Create.
- In Quick Create, complete the following options:
- In URL, type a unique customer storage name.
- In Location/Affinity Group, select a location. The appliance must be created in the same affinity group or virtual network where your web servers are located. This enables network communication between the appliance(s) and web servers.
- In Replication, select Geo-Redundant storage to replicate your data to a secondary location within the same region. This provides failover protection.
- Click Create Storage Account.
Get the storage account access key
When you create a storage account, Microsoft Azure creates a primary and secondary 512-bit storage access key. The command you use to transfer the Managed WAF appliance image from Alert Logic requires this storage access key.
To get the access key:
- Log in to the Microsoft Azure management portal.
- Select your storage account in the all items library.
- Click Manage Access Keys.
- Copy the Primary Access Key, and then paste the key into a plain text editor. You will need this information later.
Create a container
After you create a storage account and generate access keys, you must create the container to store the virtual machine and Threat Manager virtual appliance image.
To create a container:
- Log in to the Microsoft Azure management portal.
- Select your storage account in the all items library.
- From the menu, select Containers.
- Click Create a container. If you already have a container, click Add.
- Enter a unique container Name, and then select Private access.
- Click the check mark.
Transfer the Managed WAF appliance image to the container
Alert Logic maintains the Managed WAF appliance image as a .vhd file in the Microsoft Azure environment. There are two ways the image to your container:
- Enter a command in the Azure command prompt interface.
- Run a script in an Azure PowerShell session.
Command prompt method
To transfer the Alert Logic image via the command prompt, download and install the Microsoft Azure cross-platform command-line interface.

The Microsoft Azure PowerShell does not contain the commands for this operation. Use the Microsoft Azure cross-platform command-line interface.
To use the command line method:
- Launch the Microsoft Azure command prompt.
- Copy the command below, paste the command into a plain text editor, and then edit each
[variable]to match your information.
C:\>azure vm disk upload http://alertlogic.blob.core.windows.net/
wsmimage/al-wsm-image-latest.vhd [storage account URL]/[container name]/[filename].vhd [access key]
- Copy and paste the edited command into the command line interface, and then press Enter.

C:\>azure vm disk upload http://alertlogic.blob.core.windows.net/wsmimage/al-wsm-image-latest.vhd http://storageaccountname.blob.core.windows.net/
containername/al-wsm-image-latest.vhd xJdkdCi35RT2FWncoLf0xl6/pkNlHSO2/
vw3Gxs0uG+2/IN3zmHmnieeodmiNJEUkvmQctb/POTD/ONVxwx6wQ==
Script method
This method requires that you run a script in a Microsoft Azure PowerShell session. To download and install the Microsoft Azure PowerShell, visit the Microsoft Azure site.
To use the script method:
- Copy the script below, paste the script into a plain text editor, and then edit each
[variable]to match your information. Do not remove or replace quotation marks.###Script Begin######Setup variable, change (containername)###$containername = "[container name]"###Setup the destination container, change (storageaccountname, storageaccountkey)###
$destContext = New-AzureStorageContext `-StorageAccountName "[storage account name]" `-StorageAccountKey "[storage account access key]"###Start file transfer from AlertLogic to your Azure Storage Container###Start-AzureStorageBlobCopy `-srcUri "http://alertlogic.blob.core.windows.net/wsmimage/al-wsm-image-latest.vhd" `-DestContainer $containername `-DestBlob "alwsmv1.vhd" `-DestContext $destContext###Monitor File Transfer Status###
Get-AzureStorageBlobCopyState `-Blob "alwsmv1.vhd" `-Container $containername `-Context $destContext `-WaitForComplete###Script end### - Copy and paste your edited script into a Microsoft Azure PowerShell session. The script runs immediately.
You may need to change the script execution policy for the computer you are using before the script runs. See http://technet.microsoft.com/en-us/library/ee176961.aspx.
Create a disk from the transferred .vhd file
After you transfer the .vhd file from the Alert Logic area to your container in Microsoft Azure, you must create a disk.
To create a disk:
- Log in to the Microsoft Azure management portal.
- Select Virtual Machines from the left navigation area.
- Click Disks.
- Click Create.
- In Create a disk from a VHD,
- In Name, type a unique disk name.
- Select The VHD contains an operating system.
- In Operating System Family, select Linux.
- In VHD URL, browse to the container location, select the transferred .vhd file, and then click Open
- After you enter the necessary information, click the check mark. Microsoft Azure creates your new disk.
Create a Managed WAF virtual appliance
To create the virtual appliance:
- Log in to the Microsoft Azure marketplace portal.
- At the bottom of the screen, click + New.
- Click Everything.
- In Search Everything, type Alert Logic.
- Select Alert Logic Web Security Manager - BYOL.
- Click Create.
- Complete the missing fields:
- Host Name
- User Name
- Password
- Select a Pricing Tier. By default, Standard A2 is selected
For more information, see Requirements to install a virtual appliance.
- In Optional Configuration, click your storage account, click Network, click Virtual Network, and then select your desired network. This step will automatically configure your Resource Group, Subscription, and Location.
- Click Create.
- Click Purchase.
Manage the ACL for the Managed WAF virtual appliance
Once the appliance is running, you create access control list (ACL) entries for each port that allow inbound communication from the primary and disaster recovery (DR) data centers.
To create ACL entries:
- Log in to the Microsoft Azure management portal.
- In the left navigation, select Virtual Machines.
- Select your newly created virtual machine.
- At the top of the screen, click Endpoints.
- Select Managementwith port 4849, and then on the bottom of the screen, click Manage ACL.
- In the screen that appears:
- In Description, enter Alert Logic primary data center.
- In Action, select Permit.
- In Remote Subnet, enter 204.110.218.96/27.
- In the second row, in Description, enter Alert Logic DR data center.
- In Action, select Permit.
- In Remote Subnet, enter 204.110.219.96/27.
- Click the check mark.
Contact Alert Logic to claim your appliance
You must contact Alert Logic to:
- Provide the Public virtual IP (VIP) address for your virtual appliance.
- Provide your appliance external ID.
- Claim your appliance. As part of the onboarding process, Alert Logic creates your customer account and claims your appliance.
To retrieve the necessary Azure information:
- Log in to the Microsoft Azure management portal.
- In the left navigation, select Virtual Machines.
- Select your virtual machine.
- Click Dashboard.
- Locate the Public virtual IP (VIP) address.
To contact Alert Logic to claim your appliance:
- In the US, call (877) 484-8383 and select the appropriate option.
- In the EU, call +44 (0) 203 011 5533 and do the same.
Alert Logic provisioning completes your Managed WAF appliance installation and performs initial connectivity testing.
Enable inbound traffic
The Managed WAF appliance is now enabled; however, you must enable inbound traffic. Use the login credentials you received during the onboarding process to access the Alert Logic user interface.
To enable inbound traffic:
- At the top of the Alert Logic console, from the drop-down menu, select WAF.
- In the left navigation, under Manage, click Appliances.
- Click Manage Appliance.
- Under System, click Interfaces. Select Inbound traffic.
Add a website
There are four major steps to complete:
- Access the Add Website page
- Modify the vritual web server section
- Modify the real web servers section
- Modify the Initial configuration section
Step 1: Access the Add Website page
To access the Add Website page:
- At the top of the Alert Logic console, from the drop-down menu, select WAF.
- In the left navigation, under Manage, click Appliances.
- Click Manage Appliance that corresponds to the desired virtual appliance.
- In the left navigation, under Services, click Websites.
- Click Add Website.
Step 2: Modify the virtual web server section
In this step, add the website you want to protect. Managed WAF is deployed in reverse proxy mode. In reverse proxy mode, Managed WAF terminates requests and proxies the requests to the backend web server.
To modify the virtual web server section:
- In Add Website, from the Web Server Protocol list, select one of the following:
- HTTP: This option creates a website proxy that responds to HTTP requests.
- HTTPS: This option creates a website proxy that responds to HTTPS requests. Selection generates a temporary SSL certificate.
- Both: This option creates a website proxy that responds to HTTP and HTTPS requests. Selection generates a temporary SSL certificate.
- In Web server domain name, type the URL of the website you want to protect.

- In the Listen IP left column, do one of the following:
- Select an IP, and then click Add to add this IP to the Active Listen IP list in the right column. You can add more than one IP to the right column.

- If the left column includes multiple IP addresses, you can select All Inbound, and then click Add to add all IP addresses to the Active Listen IP list in the right column. This option allows the virtual web server to listen to all IP addresses configured to accept inbound requests.

- In HTTP(S) listen port, type the port. The default ports are as follows:
- HTTP: 80
- HTTPS: 443
Selection of Both from the Web Server Protocol list makes both the HTTP and HTTPS boxes available.
- Select Default Host for listen IP.
When enabled the virtual host responds to all requests for the virtual host not configured as the primary host name or as a virtual host for other proxies listening to the same IP address. The Test your website proxystep assumes this option is selected. This behavior is convenient for testing since it will send any request that is not a policy violation to the backend web server.
Step 3: Modify the real web servers section
Use the real web servers section to identify any backend web server to be protected by Web Security Manager.
To modify the real web servers section:
- From the Real web server protocol list, select the connection protocol you want Web Security Manager to use for to a backend web server.
- If you want traffic to a backend web server(s) to be encrypted, select https or both.
- If traffic does not require encryption, select http.
- Select Validate real servers if you want Web Security Manager to send an HTTP request to the backend web server to verify it responds to HTTP requests.
Clear the check box if the backend web server is not yet running.
- In Real server IP or public domain name, type the private IP address or DNS name on which the web server is listening.
- In Port, type the port on which the web server is listening . The default ports are as follows:
- HTTP: 80
- HTTPS: 443
- From the Role list, select one of the following:
- Active: Web Security Manager forwards requests to the backend web server.
- Backup: Web Security Manager forwards requests to the backend web server only if no other servers are active.
- Down: Web Security Manager does not forward requests to the backend web server.
Step 4: Modify the Initial configuration section
To modify the initial configuration section:
- Under Initial configuration, make sure WAF Default is selected.
You can return to this option if you need to make changes.
- Click Save Configuration, and then click Apply changes.
You can return to this option if you need to make changes.
- Click Save Configuration, and then click Apply changes.
Test your website proxy
You must test to verify Managed WAF can connect to the backend web server.
The following walkthrough assumes you have configured your website to be used as the default virtual host for the listen IP. You should also make sure that your website proxy is in Detect mode.
There are four major steps to complete:
- Edit the local hosts file
- Test for initial connectivity
- Test in Detect mode
- Test in Protect mode
Step 1: Edit the local hosts file
Edit the local hosts file to test traffic routed from the host provider through Managed WAF. This achieves the same result as reconfiguring NAT rules or making a host provider DNS change, but only the local PC is affected. This allows you to test Managed WAF prior to making a permanent NAT or DNS change.
To edit your local hosts file:
- Locate your hosts file. The host file can typically be found in the following locations:
- For Windows PC users: %SystemRoot%\system32\drivers\etc\hosts
- For Unix/Linux/Mac OS users: /etc/hosts
- Copy and save your original hosts file to another location.
- Edit the hosts file and route the host provider (www.example.com) through the Managed WAFweb application firewall (WAF) listen IP address (192.0.43.11).
- Save the hosts file.
- Once you complete testing, replace the edited hosts with the original hosts file.
Step 2: Test for initial connectivity
To test for initial connectivity:
- In your web browser's address bar, type your public web server IP, and then press Enter. The browser should open the default website for your Real web server. This test will not affect production traffic.
Step 3: Test in Detect mode
To test in Detect mode:
- In your browser's address bar, type your public web server IP followed by /?x=a%00, and then press Enter.
www.example.com/?x=a%00
The browser should open the default website for your Real web server and the simulated DOS attack should be registered on the Deny log as a DOS attempt.
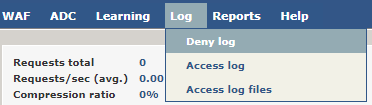
- On the Websites page, in the main menu, point to Log, and click Deny Log. To view details of any Deny log entry, click the Details icon (
 ).
). 
Step 4: Test in Protect mode
To test Protect mode:
- Open the Websites page.
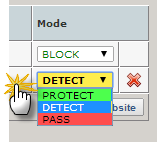
- In the Websites list, for the website you want to test, in the Mode list, select Protect.
-
In your browser's address bar, type your public web server IP, followed by /?x=a%00, and then press Enter.
www.example.com/?x=a%00
The browser should show a 404 error message. This attack should also be registered on the Deny log as a DOS attempt.
Route traffic through Managed WAF
After you have tested your website proxy, reconfigure NAT rules or make a host provider DNS change to route traffic to Web Security Manager permanently. DNS changes may take several days to propagate properly through the Internet domain servers. Once you have completed these initial steps, you can begin working with Managed WAF by adding additional sites to protect.