Alert Logic Managed Web Application Firewall (WAF) for Amazon Web Services Marketplace

- Review the Requirements for Alert Logic Managed Web Application Firewall (WAF) for Amazon Web Services .
- Before you launch your instance, you must know the following information:
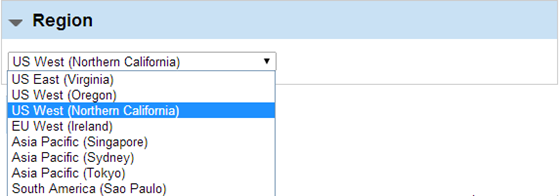
- The Amazon Web Services Region in which you will deploy Managed WAF
- The Virtual Private Cloud (VPC) where Managed WAF will run. You must know the Amazon VPC identifier for this VPC (e.g. vpc-1234abcd). This VPC must be configured to allow access to the Internet; for more information, see Amazon's documentation.
- The subnet within this VPC where your instance will be launched.
Launch your instance
To launch your AMI:
- On the AWS Marketplace website, on the Web Security Manager product page, click
 .
.
- Click 1-Click Launch.

- Under Version, leave the default version selected.

- In Region, select the Region where your AMI will be hosted. This region will dictate what subnet and VPC you can use for the AMI.
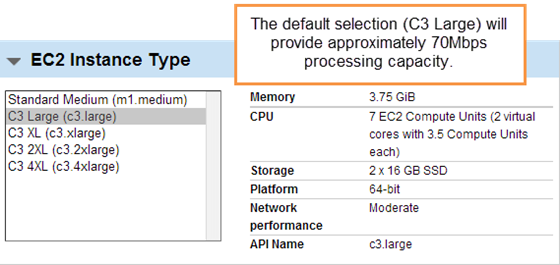
- Under EC2 Instance Type , select the instance type you want. The default selection will provide approximately 70Mbps processing capacity.
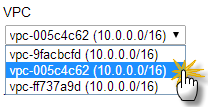
- Under VPC Settings, select the ID of the VPC where you will deploy Web Security Manager.
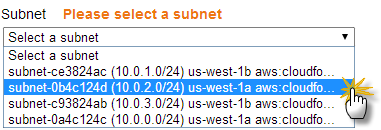
- When you select a VPC, the Subnet list will open. Select the Subnet you want from the list.
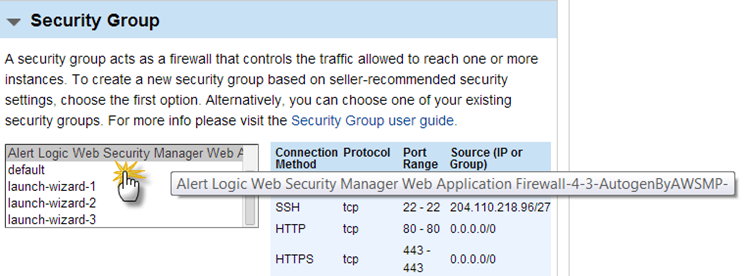
- Under Security Group, you have two options:
- If you have not completed this process before in this Region, select Create New Based on Seller Settings.
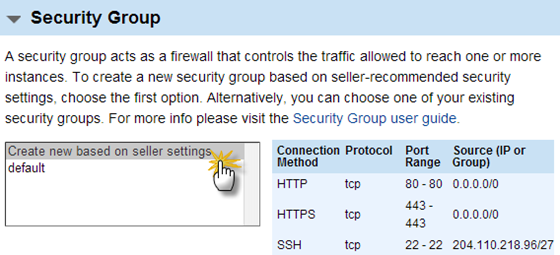
- If you have completed this process before in this Region, select Alert Logic Web Security Manager Web Application Firewall-4-3-AutogenByAWSMP.
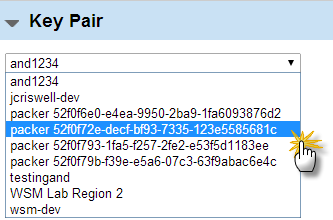
- Under Key Pair, make sure a Key Pair is selected. If there are no Key Pairs, AWS will ask you you to create one.
- Click
 . A pop-up window will open with the message, "An instance of this software is now deploying on EC2." You can close this pop-up window.
Modify the security group
You will modify the security group to give yourself access to the Managed WAF instance.
To modify the security group:
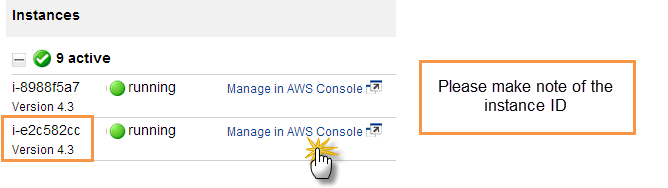
- On Your Software Subscriptions page, for the Instance you have just launched, click Manage in AWS console. You may have to reload the page to see your instance.
- In the AWS console, in the left navigation, under Network and Security, click Security Groups.

In the Security Group search box, you can include a filter, or search by keyword.

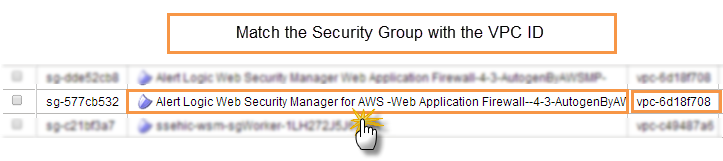
- In the Security Group list, search for the Security Group, Alert Logic Web Security Manager Web Application Firewall-4-3-AutogenByAWSMP that is associated with the VPC ID that you selected for this Region. Click this security group. Security Details opens beneath the Security Group list.
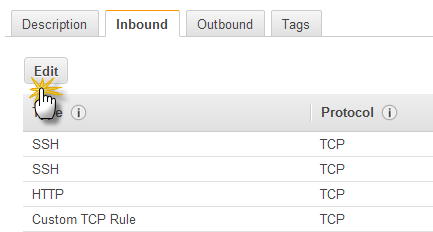
- Under Security Details, click Inbound, and then click Edit.
- In the Edit inbound rules dialog, click Add Rule, and make sure that Custom TCP Rule is selected for the new rule. In Port Range, type 4849.
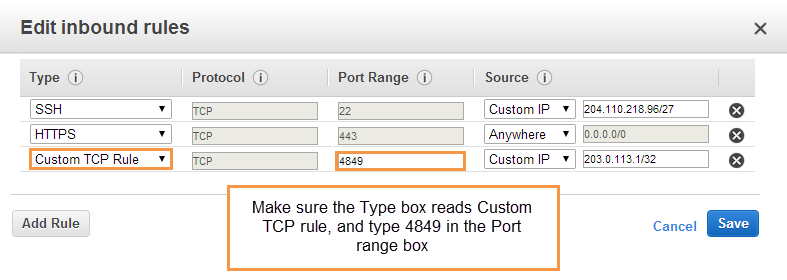
- In Source, type your Public IP address in CIDR notation (e.g. 203.0.113.1/32). If you do not know this IP address see (
 ) http://checkip.amazonaws.com/.

- Click Save.
You should confirm inbound and outbound security group settings are correct. See Requirements for Alert Logic Managed Web Application Firewall (WAF) for Amazon Web Services .
Allocate and assign an elastic IP
You will create a new elastic IP address, and then associate that address with your instance.
To create and assign an Elastic IP:
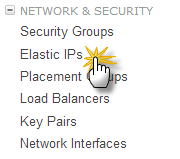
- In the left navigation, under Network and Security, click Elastic IPs.
- Click
 .
.
- In the Allocate New Address pop-up window, click
 .
.
- In the Elastic IPs list, select the new Elastic IP you created and then click
 .
.
- In the Associate Address pop-up window, in the Instance list, select the instance you launched, then click
 . You can leave the other settings in the pop-up window at their defaults.

Open the Activation page
To open the Activation page:
- After you have associated your Elastic IP with your instance, return to Your Software Subscriptions, . You may have to reload the page to show the changes.
- In your Subscriptions list, find the instance that you have just created and click Access Software. A certificate warning page will open. Click Continue or Proceed depending on your browser. This will open the Web Security Manager Activation page.
The process of booting the instance, associating the IP, and making it reachable may take a few minutes.
Alternative method to open the Activation page
If step 3 above does not work for some reason, there is an alternative method to open the Activation page. After you have associated your elastic IP address with your instance, in your browser's address bar, type the following address: https://[your elastic IP here]:4849, (e.g. https://203.0.113.254:4849). A certificate warning page will open. Click Continue or Proceed depending on your browser. This will open the Web Security Manager Activation page.
Activate your appliance
New customer activation
- On the Managed WAF Activation page, in the box corresponding to the location of your data center, click Create Account. This opens the Alert Logic Sign up page.
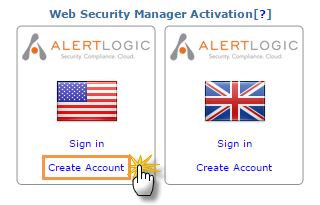
You must select the location of the data center, either US or UK, to associate with your account. Select the UK Data Center if you are in Europe, have a European-based organization, or have compliance standards that require data to be stored in Europe.
The US and UK data centers do not share data, so you should associate all instances for your enterprise with one data center or the other.
- Type your credentials in the boxes provided including your 12 digit AWS account number, and then click Sign up. This opens the Alert Logic login page, and initiates account activation.

- An email will be sent to the email address you provided in the initial sign up process. This email will contain an activation link. Click this link to activate your account. This link opens the Activating Account page.
Your account activation may take several minutes. Please be patient.
- When your account has been activated, you will receive an email with your temporary login credentials. The email will also contain a link to the Alert Logic console. Once you receive this email, click the Login to add a website link and use the credentials provided in the email to log in to the Alert Logic console
When you log in for the first time you will be asked to change your temporary password. After you log in the system displays the Welcome page where you can add a website to Managed WAF.
To add a website from the Welcome page:
- Under section 2 Add a Website, select an appliance, and then click Add a Website.

Existing customer activation
- On the Managed WAF Activation page, in the box corresponding to the location of your data center, click Sign in. This opens the Alert Logic console login page. Log in using your credentials.
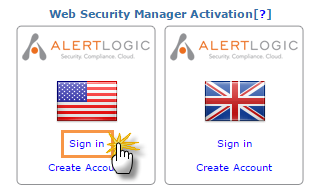
You must select the location of the data center, either US or UK, to associate with your account. Select the UK Data Center if you are in Europe, have a European-based organization, or have compliance standards that require data to be stored in Europe.
The US and UK data centers do not share data, so you should associate all instances for your enterprise with one data center or the other.
- Once you log in to Alert Logic console, you will see the Summary page. At the top of the Alert Logic console, in the drop-down menu, click WAF.
- On the left navigation, under Manage, click Appliances.