Install the Alert Logic agent for Windows
Alert Logic provides a single agent that supports Threat Manager, Log Manager, and Web Security Manager. The agent gathers data that Alert Logic must collect for analysis, such as log messages and network traffic, as well as metadata and host identification information. You can assign a maximum of 500 agents per corresponding appliance in both Linux and Windows, regardless of appliance size. Refer to the Requirements for the Alert Logic agent page for the minimum system requirements to communicate with the physical appliance.
For more information, please contact Technical Support: US:(877) 484-8383, EU: +44 (0) 203 011 5533
Download the agent
To download the agent:
- In the Alert Logic console, open the Settings menu, and then click Support Information.
- From the menu bar, click Quick Install Guide and Downloads.
- Download the appropriate agent and follow the on-screen instructions.
- For Windows users, click Windows Agents, and then select the desired agent.
- For Linux users, click Linux Agents. Linux users can select either Debian-based agent installers or RPM-based agent installers. Both installers are available in a 32-bit or 64-bit format.
- Locate the Unique Registration Key from the Downloads screen. Copy your unique registration key. You will need to enter this key to install the agent.
If you have an active RBAC role, and have configured agents to automatically update, the agent you install automatically assigns itself to the local appliance and you need not enter the Unique Registration Key.

Alert Logic uses the Unique Registration Key to assign the agent to your Alert Logic account.
Install the agent
If you have an active IAM or RBAC role (for AWS or Azure, respectively), and have configured agents to automatically update, the agent you install automatically assigns itself to the local appliance and you need not enter the Unique Registration Key.
Install the agent via the GUI
To install the agent:

This method does not support image capture.
- Run the MSI package.
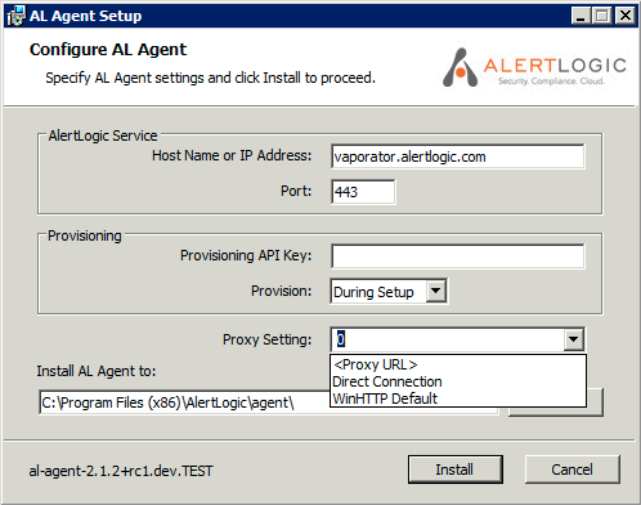
- In Provisioning API Key, paste your Unique Registration Key.
If you have an active RBAC role, and have configured agents to automatically update, the agent you install automatically assigns itself to the local appliance and you need not enter the Unique Registration Key.
- In Provision, select During Setup.
- In Proxy Setting, select a connection method if you want traffic to pass through a proxy. You can connect via Direct Connection or a web proxy. You can also enter the URL of the proxy server.
- Click Install.
- Verify that the agent has registered with the Alert Logic console. To do so, navigate to the deployment the agent is assigned to, click Hosts and Sources, click Sources, and then search for the agent.
Agent registration can take several minutes.
Install the agent via command prompt
To install the agent:
- Copy the MSI file to the target machine.
- Type the following command:
msiexec /i [path to MSI file] prov_key=[unique registration key] install_only=1 /q
- /i installs the agent normally
- prov_key=[unique registration key] is your Unique Registration Key
- Command prompt example:
msiexec /i c:\downloads\al-agent-2.1.2.msi prov_key=da39EXAMPLEd3255bfef95641890dnu80799 install_only=1 /q
If you previously installed the Alert Logic agent on the host, the system may reboot to complete the installation. If you want to avoid the system reboot, and consequently pause the installation process until you manually reboot, append to the command prompt:
REBOOT=ReallySuppress
- (Optional) If you have set up a NAT or virtual appliance and you want to use it as a single point of egress, enter the corresponding host name or IP address or port via the following command prompt parameters:
- sensor_host=[host] indicates the IP address where the agent should forward logs.
- sensor_port=[port] indicates the TCP port where the agent should connect.
For other command prompts parameters, see (Optional) Windows command-prompt installation parameters .
-
Once you are finished preparing the image, set the agent service start type to Automatic:
sc config al_agent start= auto
Do not start the agent or reboot the image before capturing the image of your virtual machine.
- (Optional) You can capture an image of the virtual machine that contains the installed agent.
- (Optional) Start an instance of the saved image and verify that the agent has registered with the Alert Logic console.
If you need to edit your OS image at any point, you must ensure when saving that the Alert Logic agent is *not* registered. You can accomplish this by stopping the agent with:
sc stop al_agent
Then, if it is present, remove the files:
%CommonProgramFiles(x86)%\AlertLogic\host_crt.pem
%CommonProgramFiles(x86)%\AlertLogic\host_key.pem
where %CommonProgramFiles(x86)% refers to "C:\Program Files\Common Files" for x86 versions of windows and "C:\Program Files (x86)\Common Files" for amd64 and ia64 versions.
(Optional) Windows command-prompt installation parameters
To use optional command-prompt parameters during the Alert Logic agent installation, review the following:
| Optional command-prompt parameters | Description |
|---|---|
| /quiet or /q[level] |
Use this option to create different levels of user access. Use the following values for [level]:
|
| /log [log file] (or for a verbose log /l*vx [log file]) | Use this option to troubleshoot installation failures. [log file] is the path, created by the installer, to the log file. |
| sensor_host=[host] | Use [host] to specify the IP address where the agent should forward logs. |
| sensor_port=[port] | Use [port] to specify the TCP port where the agent should connect. |
| use_proxy={0|1} | Use this option to specify whether the agent should use WinHTTP proxy settings. |
| installdir=[directory] | Use [directory] to specify the folder where the agent files should be installed. |
| reboot=ReallySuppress | Use this option to suppress any reboot prompts, leaving the installation incomplete until the next restart. |